Latest Posts by marathon-notasprint - Page 3


My exams are rapidly approaching (just 9 days left!!) and amongst all the study tips posts that are popping up, I wanted to do a post about those days when things don’t go as planned. Be it that you walk out of an exam and feel like you bombed it, or that you get back a disappointing score. We all know the feeling. So here are some things that I like to do to make the day suck a little less!
Have some chocolate (light/dark/milk, hot/cold/whatever as preferred)
Have a bath, or a long shower
Go for a walk or a jog, preferably surrounded by nature
Find someone/something to cuddle
Even if you have things to do, give yourself a break
Tidy your room/flat/whatever to get a fresh perspective
Open all windows and air out your room
If you have things that need to be done, make a to do list and sort your brain out
Organise your clutter/notes/room/whatever
Do come colouring in a colouring book (these are awesome)
Try your hand at painting, even if you’re terrible at it
Make yourself some tea
Bake something (and eat it without feeling guilty afterwards)
Light a nice-smelling candle
Spend time with the positive forces in your life, be it parents, friends or pets
Watch your favourite movie (preferably with someone who loves it as much as you)
Go on spotify, pandora, soundcloud, 8tracks or wherever and look for new music
If you find some really good music, have a dance party
Put on your favourite outfit (+ makeup look if you’re into that)
Paint your nails, shave, moisturize, wash your face and pamper yourself
Check out universityandme‘s “You are a force of nature” tag
If you need someone to talk to, send me an ask, either here or on my main blog, saturdaystudying


Achieving your full academic potential: Things to Avoid Doing
Things you may want to avoid doing in the future.
Doing, wait, not doing these things always works for me.
Staying up late.
Sleep is yes. And as my speech coach puts it “there are only so many all nighters a person can pull before they just can’t”. Not only will staying up uber-late make the next day a battle between you an a surprisingly pillow-like desktop, if you’re tired, your work probably won’t be the your best.
Over-scheduling.
It’s easier to look at a schedule with 3-4 assignments than it is to look at one with 9-10. When scheduling, if you have a plethora of assignments, prioritize. Write down the most important assignments, and leave any others off the page or in the margins. You only have so many hours in the day and it’s better to complete the most important tasks than none at all.
Pro-tip: The Pareto Principle. The Pareto principle revolves around the 80%-20% ratio. Allow me to explain, if you have 10 pieces of work, there are probably only two of them that will take up 80% of the work. And 8 of them that will take up 20% of the work. The key to prioritizing is finding those two assignments (or however many = 20% in your workload) and doing them first
Working in bed or laying down.
NONONONONONONONONONO. This is how “cat-naps” happen. You swear that you’re going to get straight to work and then your phone on the bedside table lights up. It’s too hard to organize a book, a notebook, and a laptop on a bed without moving the laptop off of your lap. So why not check it?
Working in bed helps the boogeyman grow under it.
Over-working.
If you take on more than you can handle, you will not get the results you want. It’s perfectly alright to challenge yourself. In fact, it’s great. But, there is a difference between being ambitious and stressing yourself out. If it’s too much, go back to the Pareto principle and prioritize.
Drinking excessive amounts of coffee and energy drinks. (Especially in the afternoon.)
One (maybe two, if you ordered a tall) cups of coffee in the morning is fine. But in the afternoon or the evening, stick to exercise, healthy snacks, and naps. Sugary energy drinks as well as coffee that contain caffeine can speed up your heart rate, cause stress, and irregular breathing patterns. If you become addicted to caffeine these things will accelerate and can end up hurting you detrimentally.
Over-using productivity apps.
Productive apps are awesome, if used correctly, don’t abuse them. It was difficult for me to use productivity apps on my phone at first because the other things on my phone would distract me. If you plan to use productivity apps on you phone and computer make sure that you have the self-control needed o use them properly.
Tumblr. - I’m only half kidding
Those are the general ones, these are a bit more subject specific
Math/science
Falling behind.
In other classes falling behind is not recommended, but is usually fixable by reading a few chapters or asking a friend for notes. Because of arithmetic’s complex nature that relies not only on facts, but applying them it is very difficult to master one a concept while you’re supposed to be mastering another. Often, learning one key concept can help you with many other assignments, not learning key concepts can make those other assignments 10x harder.
Receiving low homework scores.
In all of the math classes I’ve been in, the homework scores were more of your grade than your test homework. Always turn in your homework, even if it feels impossible, try your best, and never leave your paper blank. Even if you got all of the answers wrong, many teachers will give you serious credit for trying and failing rather than just failing.
Learn everything from the teacher.
There are a plethora of online math resources that are awesome, and math teachers usually only teach one method of solving a problem. Try Khan Academy , For Dummies, or IXL. Or look around a bit, there are a lot of other great sites, those are just my favorites.
Learn everything. (This is usually for science.)
In science (especially in biology and Earth sciences.) you are introduced to a myriad of concepts and vocabulary words that might seem like too much to memorize. Don’t. Look at what your teacher puts emphasis on and memorize that. Also, if you are using a textbook, there is a good chance that the textbook is filled with notes on the ‘key concepts’ or learning requirements for each chapter. These are also things that you should attempt to memorize.
English/writing/history/ other humanities
Not develop an opinion. (Especially in history)
If there’s anything a english/ writing/ history teacher loves, it’s an opinionated student. Textbooks give you facts and figures, and you can interpret them however you want. So, do just that. This will show your teacher not only that you are interested in his or her subject, but that you are engaged in the material that they gave you.
Ignore teacher comments. (No matter how small.)
It isn’t fun to read nit-picky comments about your work. Especially on your writing. But look at them. Even if you receive a good grade on a paper, applying corrections on your next one will ensure that you get a better grade the next time.
Staying quiet in class.
I understand that for some people this one is hard, for some people this one is practically impossible. But teachers love it. If you can, voice your opinion and answer questions in class as frequently as possible. I’ve even received extra credit for being verbally engaged in class more than other students.
Not trying to learn everything.
This one is a lot like the ‘not ignoring teacher comments’. A lot of information slips through the cracks (especially in english) that pops back up on exams. Because most of what is learned in an english class is not drilled into you like it would be in a math or science class, to do well, you have to drill yourself. I’ve been told the difference between ‘affect’ and ‘effect’ plenty of times, but I didn’t truly learn it until this year when I had to study it for an exam.
Pro-tip: Don’t challenge your teachers. They determine your grades. Momentary satisfaction is not worth a bad grade.
Hope this was useful!

Organization
How to Take Notes from a Textbook
How to Write Long Papers
Organization Tips
How to Choose the Perfect Planner
Bullet Journaling How-To
Keeping Your Cool
Focus and Energy Management for Students
Sending Emails to Teachers
Waking Up Early
Achieving your full academic potential: Things to Avoid Doing
Study Playlists
College
tips for college freshmen
How to study like a straight A student
College Tips
42 College Tips I Learned Freshman Year
College tips: Advice from a professor
10 Commandments of Dorm Shopping
AN EASY GUIDE TO BE HEALTHY IN COLLEGE
How to Write the Perfect College Essay
COLLEGE SHOPPING LIST
10 Tips for Getting Along With Your College Roommate
High School
33 Things High School Seniors Wish They Knew As Freshmen
Expert nutrition tips for high school athletes
16 Studying Hacks For Finals Week
School Tips
High School Advice
Survive high school with our how-to guide
Back to School: Tips For Surviving High School (Video)
JUNIOR YEAR ADVICE
13 Incredible Back-To-School Hacks You Won’t Believe You Survived Without
Senior Year Advice
Back to School: Your Help Guide to Waking up Early
1. Set your alarm for waking up early, a week or more before school starts. This will help you get into the habit of waking up earlier and you will ease yourself into it so that by the first day back you can wake up feeling refreshed instead of grumpy
2. Keep your phone away from you when you sleep… on the other side of the room if possible or maybe inside the drawer of your bedside table. This forces you to actually wake up and be attentive in order to turn off that alarm instead of just being able to roll over and tapping snooze.
3. Get out of your bed and open the curtains or blinds to let sunlight in, it will energize you and again force you to wake up. Plus, who doesn’t like watching the warm rays of the rising sun, if you are a nature lover or you just enjoy watching the sunrise this will even help you start your day on a positive and productive note.
4. Try to set yourself a regimen, I know this is hard because of all the homework and assignments and jobs or extracurriculars that accumulate over the school year but if you put in the effort to set yourself a regular sleep time each night you will definitely see the results.
5. Plan the night before. If there’s anything that you can get done fairly quickly at night so that you have more time to do things in the morning instead of rushing yourself because you’re rampaging through the house trying to find the pair of jeans that you thought was in your closet. The benefit of this is that your subconcious and concious mind will both feel at ease knowing that you are more relaxed about the day to come and it will allow for a better sleep which in turn will help you wake up on time.
Do you guys have any tips for waking up earlier in the morning for school? Reply to this post!
xo
Some Good Study Playlists
Here are some study playlists I think are really motivating and keep you working. I personally love listening to study playlists while studying this keeps me really motivating and i don´t even see the time pass by. Hope i could help you (:
-Eat.Sleep.Study.Repeat
-Studdy Buddy
-Survival kit to finals
-Study Mix I
-Concentration
-Concentration part 2
-Concentration part 3
-Study with Accompaniment II. III.
-Instrumental Mega Mix
and
-Rainy Mood


HELLO AGAIN EVERYONE!
I thought that since in the last few days I’ve been working on organizing my school supplies I share a bit about how i organize my binders! I hope this helps some of you a little bit! :)
Things You’ll Need:
One set of dividers for each binder
One 1 ½” binder per class, per semester
Optional Supplies:
Labels
Step One:
Lay out one full set of your dividers and decide what kind of organizational scheme you’re going for. Possible systems include:
Chronological Order – This is usually the best choice if you haven’t received or won’t receive a full and detailed class syllabus. In this system your first divider will show you where all of your important documents for the class are held (for example: you might put thing like project outlines here). The next divider will separate where regular handouts and class work from the rest of your papers. After your handouts, you’ll want to create a section for your in-class notes. Following this, you’ll want to place a divider to separate your homework assignments. These two sections are where the chronology of the class comes into play, because you’ll want to date everything and keep it in chronological order. After your homework assignments you’ll want one final divider so that you have a place to keep all of the marked tests and assignment rubrics you’ve got back from your teacher/professor.
The Sandwich – This system works best when you receive a full and detailed class syllabus. At the front of your binder, create a section using one divider for important documents (like the syllabus). After this, create one section for each major unit you’ll be covering in class. After these sections, you want one final one for tests and rubrics that have been graded and handed back to you.
If you feel that colour coding helps you stay organized, try to stick to one system for all of your binders; this way you can use the same colours in all of your binders for their respective sections (e.g., red for important documents, green for graded tests/rubrics, etc.).
(Optional) Step Two:
If you’re planning on labeling all of your binders, now would be a perfect time to do so. Possible uses for the labels might include: using one on the front/spine of the binder detailing the name of the class, the teacher, and the building and room in which it’s held, or using them to label each of your dividers with the names of their sections.
Step Three:
Insert all of your dividers into your binders, making sure to add a little bit of loose-leaf paper where you need to. If you’re using a notebook instead of loose-leaf for your homework or other things, make sure you still add a bit of paper – just for those days when you’re in a rush or you’re just not feeling well and you totally didn’t forget your notebook… ;)
Step Four:
Step back and admire your work, then remind yourself that the things that go in these binders are important, but they aren’t so important that they can ruin your life. You’ll be okay if you don’t reach your targets, but that shouldn’t stop you from trying to reach them. Do your best and recognize that that’s the extent of what you can do. I believe in you.
Now before I finish, I’d like to add a small disclaimer: by no means am I saying that the methods of organization are the only or the best methods to use, however they are the ones I’ve always used and I’ve found they work quite well. If your teacher wants you to organize in a certain way, use that way, and if you have a system that you like and find works well for you, feel free to message me – I’d love to learn about it!
I hope everyone has/has had a wonderful first few weeks of school! If you haven’t or you’re feeling overwhelmed, my ask is ALWAYS open if you want to talk! I love you all, and I BELIEVE IN ALL OF YOU ♥
Hi I’m really indecisive and I’m trying to create an effective note making system for this year. Do you have any tips on how you take notes or use colours, post it notes or anything else? I'm hoping to do maths, science or language subjects if that makes a difference. Thank you! x
Hello!
Personally during high school I kept two notebooks per subject. In general, I used one of them (notebook A) to take notes during lessons, and the other (notebook B) to rewrite them at home adding information from textbooks and making sure I understood everything.
For maths I followed the lessons on my book and did most of the notes at home. I kept a notebook to write the theorems and explanations I had to study, and an other one to do all the exercises and problems.
For science I had lessons very full of information, so on one notebook (A) I would write really fast everything I could, and on the other (B) I would rewrite everything checking the textbook. When I saw the teacher was following my textbook pretty closely, I just underlined the parts she explained during the lesson and added the extra information she gave in the margins. Then I would write the notes assembling the underlined parts and the margin notes in a notebook (B). If there were any graphs I had to write, I would do that in a different color.
For language subject I’m n to sure what you mean… But if it’s literature, I took notes during lessons on sheets of paper and combined them at home with the information on the textbook in a notebook. If it’s a foreign language, I personally studied latin, and I had a notebook for grammar and one for exercise.
I used highlighters in my textbooks, and even though I didn’t exactly color-code, I did use different colors to underline concepts of different importance. For example, I would use a more visible color such as a green/blue/pink for the most important concepts, and a more subtle one, like yellow, for less important (but still important) things. If there were textbooks that I did not want to ruin, I underlined with a pencil and a ruler, using a double line or a zigzag line for more important things.
In my notes I use colors to write important words or concepts. It doesn’t really matter to me which color I use, but to keep my notes very clean I tend to use black and blue. I use a lot of colors when I condense a lot of information in a small amount of place, like on one sheet of paper. In that case I use different colors for different topics. For example if I want to condense information about macromolecules, I would use a color for carbohydrates, a color for proteins, a color for fats etc.
I only use post-its in my textbooks to find easily where certain topics are, but I don’t really use them in note taking.
I hope I was helpful!
ewwwwwwwwwwwwwwwwwwwwwwwwwwwwwwwwwwwwwwwwwww
writing adult emails is awful
its like
hi [name of person],
this formatting is making me uncomfortable but I have to tell you something / ask you something that is vital to my career as a student.
I re-read and edited that sentence for an hour, but you’ll probably just glance over it for half a second.
thanks!
- [name]


// I’m back with some tips on taking notes from readings! This is a sequel/prequel (whatever floats your boat) to how to take lecture notes. One big tip I have is that you shouldn’t really be using the same study methods for every single class in your undergraduate career. Different subjects/professors/assessments/levels require different methods. The more attuned to that you are, the more likely you’ll get that A
OKAY GUYS LISTEN UP so there’s this website called slader.com and it has EVERY FUCKING ANSWER TO EVERY TEXTBOOK EVER. It has answers AND shows you ALL the work so you can understand it (or be a slacker). This website has literately saved my calculus grade. It even has free tutors if you need the extra help. Guys, it’s free to register and it will save your life


Superb Study Guides and Mini Moleskines
(A more concise version of this will be published in my college’s newspaper on Thursday. I will likely add or link diagrams and examples to this post, so you can check the original here.)
As a tutor, many students ask me for tips on making study guides. Generally, my response is that, “it depends”.
But hold on. Before we continue we should discuss what the purpose of a study guide really is.
Study guides fall into two main categories: study guides that prompt you to find/think about information and study guides that directly organize the information you need to know. Some professors provide you with study guides of the former kind (i.e., you’re not given the answers), and it’s essentially your job to create your own study guide of the latter type. Both categories serve the purpose of organizing information you already have in order to synthesize a study tool that best facilitates your comprehension and memorization of the information at hand, just at a different stage in the process.
Before you even start, it is helpful to be aware of the level at which you are required to know the information for your test. The most basic of these is recalling definitions, which can accomplished by use of flashcards. Other information you’ll have to know will require you to compare ideas or apply them. Think of your learning process as literal → interpretive → applicative, meaning you will need study guides that help you visualize, draw relationships, and understand material so you may memorize less in a way that helps you answer more, and better than straight memorization ever could.
–
Concept Map:
These can be anything from a basic branching diagram to a complex mind map. This type of study guide allows you to compare information in a more spatial manner than strictly linear. Let’s be honest; sometimes linear learning is unrealistic, because our world is not truly linear. This format allows you to start from the basic, bare bones of the topic you’re studying and expand into very specific details and examples. This way you can get a really solid overview of the information and delve deeper as necessary. At least for mind maps in specific, Mindly is a beautiful and highly functional mind mapping app for iOS. It’s worth the small price, I can tell you that.
Comparison Chart:
Another visually-oriented type of study guide, comparison charts are the easiest way to map out similarities and differences for various topics. The biggest advantage of this method is that you can easily find the important similarities and differences of the subjects in question without having to reread a chapter or search through your piles of notes. It won’t help you visually connect topics like a mind map would, but this very simple tool is important and useful in its own rite.
Index Cards:
Before you skip over this because you think you know what I’m talking about, this is not the same as a flashcard. Flashcards have the very basic purpose of helping you memorize information, and little else. Index cards, however, are like flashcards on steroids because they contain much more information and are used primarily to summarize key information in a portable way that allows you to easily locate more details if necessary. Allow me to break down how you might want to use this method.
Front:
Middle: Main idea [e.g. alveoli]
Upper Right: Organizational term [e.g. respiratory system]
Bottom Middle: Source of information [e.g. Chapter 17, pg. 479 or Notes from 11/26/2013]
Back:
In your own words, what’s most important to know about the concept.
Include examples, summaries, diagrams, definitions, etc.
Be detailed! Remember, this is not about strictly memorizing.
Make sure the content corresponds to level of understanding your professor excepts
Diagram:
This one is pretty self-explanatory, but is extremely dependent on the topic at hand. This could be anything from a chemical reaction scheme, a cycle, Venn diagram, etc. You may even consider making a timeline, which is great for chronological organization of ideas. This is not limited to history, though! You can also organize information from classes such as anthropology, psychology, biology, anatomy, physiology, ecology, etc. If it has a specific, linear order, it can be made into a timeline.
Question Prompts:
This method I find works very well if you use the Cornell note-taking method. If you’re using Cornell notes, you would write your prompts in the left hand column next to where the answers are located, then just cover up the answers when studying. For example, for something as simple as a definition you could write, “What is _____?” For something more complicated such as a comparison chart, you could write, “What are the key differences between _____ and _____?” If you want, you can even ask questions that aren’t directly answered in the adjacent text such as, “Why is [idea] important to [concept]?”
–
Now that you know what formats you might use for your study guides (remember you don’t have to stick with just one), you may wonder where you can put this information. The basic answer to that question: anywhere. Many people like to draw these things on computer paper. You may want to type some of these things. If you’re using Mindly then you would be inputting the information into an app. I would like to offer up the suggestion of little mini notebooks for each class. I personally make these study guide materials on paper or a computer first, then when I’m satisfied with the result, I copy it down into my pocket-sized Moleskine notebooks. I personally prefer the squared, dotted, or blank notebooks, but whatever suits your fancy. The benefit to these little notebooks is that you have all of the information you need to study for in a small, convenient little book that you can easily keep in your backpack all the time because of its size. (Ladies, it will even fit in a clutch!) Study on the bus, waiting for class to start, when eating at the cafeteria, while waiting for your laundry to finish, etc. Not to mention, this will help you avoid losing papers because they’re all in one place.
Just try not to lose the notebook.


04:10 PM // Hello! I made these mind maps a few days ago. I’m really proud of them considering I never made one before.
5 Tips when it comes to Mind Mapping
1) Decide on your paper size Before you start writing anything it’s really important to work out what size paper you want to do your mindmap on. Be it A3, A4, A5 or any other size you can think of, deciding this early on will make things much easier in the long run and leave you with a much more organised mind map
2) Work out the basics Before you actually start writing anything it’s a really good idea to work out the basics of your mind map. What type of bubble do you want the title to be in? Spiky or a cloud or just a plain circle? What kind of lines to you want leading off from it? Arrows or just plain lines? Straight or curved? Taking 30 seconds to work these out before you start will make everything much easier in the long run and leave you with a much neater and better organised mind map
3) Choose what to write with This part is all down to personal preference. Do you prefer writing in a plain colour and then highlighting later? Do you want each section in a different colour? Felt tips or biros? Fineliners or pencils? This is the time when you can think about what you’re most comfortable writing with and what’s going to make it easiest for you to retain the information
4) Add pictures and diagrams Adding little drawings to aid your explanations is a really great way to help you remember what you write. You don’t have to be good at art to make this work, just add a few little diagrams here and there and you’ll be surprised how much more easily you retain the information
5) Have fun with it You may be looking at a picture of a mind map online and saying to yourself ‘that’s exactly what I want mine to look like’ but in reality that’ll never happen. You’ll never manage to get a mind map that looks exactly the same as someone else’s and in all honesty that would be a bit boring. Instead just get stuck in and create your own unique masterpiece


{28/03/15} - It’s embarrassing how much making these excites me… trying to make a subject I find boring a little more amusing and I think it’s working?


hi there, can you make a post about making mindmaps please?
There are many types of mindmaps, and they are all different depending on what they’re focused on ~ generally, they have the same structure, but just be careful if you’re doing a science-based one while following a literature-based tutorial.
Here’s a tutorial based on my most recent one {for English class, based on the novel Brooklyn}, hope it helps!
Keep reading


Organising a Notebook:
I was looking at methods of keeping notebooks organised and I came across a really interesting blog post (source) that I want to share with you all. All of the pictures in this post come directly from the original blog post.
Make your entry into your notebook. In the example photographs, they have recorded a Chinese recipe.

Go to the back of the notebook and add a tag or title, e.g. “Chinese” on the left edge of the page.

Go back to the first page where the entry was, and on the same line number as you wrote “Chinese” make a black mark on the edge. You make this mark so that even when the notebook is closed, the mark is visible. After repeating this for various recipes, you now have various tags visible on the notebooks edge.

If you ever wanted to find a Chinese recipe, you simply look at the index, locate the label, and look along the visible edge which has been tagged as Chinese. Then just flick to each marked page.

You’re not limited to one tag per page. You could tag a page 2 or 3 times. So if you jot down a chicken stir fry you could tag it as “Chicken” and “Chinese”.
college note taking 101: how i take notes and use them to study for exams
in lecture:
i like to take quick/shorthand notes because i think learning to discriminate between what is and isn’t important material is a good skill to have so i’m not drowning in useless information when it’s time to study for a midterm or final.
i like to bring my ipad and use the notability app. it’s easier for me to just carry an ipad mini and stylus than it is for me to lug around a heavy notebook/binder and several pens/pencils.
if the professor makes lecture slides available to students online (via a class website), i like to download them onto notability and annotate them as the professor goes along. that way, i can focus more on what the professor is saying and less on merely writing everything down.

if lecture slides aren’t available, i type out my notes as i find it faster than handwriting them.
at home:
once i’m home, i take out my ipad and copy down my lecture notes into a specified notebook for that class, explain everything more thoroughly, make them neater, and organize them in a way that makes more sense to me (as opposed to copying them down exactly as how they were presented in lecture).
i like to use lots of colors, highlighters, and etc. and make them as pretty as possible so i actually want to use them to study from in the future.

integrating reading notes:
normally, what professors will do is assign reading from a textbook and base their lectures around the reading (or have the reading be based on the lectures). usually exams/tests will rely mostly on what was said in lecture instead of in the reading and this is partly because they overlap so much. what the professor says in lecture, you should consider the “important points” in your reading. sometimes, though, there are things in the reading that seem important and weren’t mentioned in lecture.
what i’ll do if this is the case is take post-its, write the piece of information down, and stick the post-it in my notebook in the corresponding section (i.e. where it fits best with my notes)

i like this method as opposed to taking notes directly in my textbook or having a separate notebook for only reading notes because 1) i’ve consistently found that reading material is not as heavily focused on in tests as lecture material and 2) i like to have all of my information in one place
using my notes to study:
when an exam is coming up, what i like to do is take all of the information in my notebook and condense it into a study guide that i can use to study from.
the format of my study guide varies depending on the class and which type of study guide and method of studying i think will help me best. my study guides range from flash cards to mind maps to sheets of paper with a bunch of condensed information.

if i come across a concept on my study guide that i can’t completely explain to myself/don’t fully understand, that’s when i’ll look back in my notebook for a better and fuller explanation of it.
i also like to give myself some time before an exam to completely read through my notebook and look at all the notes i’ve taken (not just what i have on my study guide) because i think it’s a good refresher of all of the lecture and reading material and all of the information will be brought forward in my mind.
[* a few of you have asked me for a advice on note taking: how i take notes, methods i use, how i study from them, and etc. i hope this post was helpful to you! feel free to message me if you have any other questions. happy studying! ^_^]
MASTERPOST

Hi! This is going to be pretty long and I have tried my best to cover as much as I could. If there are any specific requests, please message me on my personal blog! (Linked in the description.)
Study stuff
How to make a study schedule
Daily printable planner (with to-do list)
By the hour detailed planner (printable)
2015 printable calendar
Improve vocabulary in 5 minutes
Cornell note-taking method
More note-taking
10 general study tips
Crash Course
Best damn tutoring
Math tutor
Khan Academy (obvs)
University of reddit
Coursera
edX
Ways to boost your note-taking
Awesome study flowchart
Websites to increase productivity
Get shit done even when you don’t feel like it
How to not freak out during finals
Subject-specific tips:
Square root calculator
Cube root calculator
Oil painting
Reading a painting
Free language tutorials (20 LANGUAGES)
Shakespeare deaths infographic
A HUGE ASS WRITING TIPS MASTERPOST
Synonyms for commonly used words
Put your feelings into words (I know, I know, it’s complicated. Maybe this will help?)
Common grammar mistakes
More common mistakes (after all, to err is human)
Masterpost with music to influence your writing
Words. You’re welcome.
Try this math game
Wolfram Alpha
Text books are fucking expensive. Go here, okay?
How to not say the word ‘very’
‘Everyday compounds’ infographic
Online courses masterpost (apart from the sites I’ve mentioned)
Nervous system chart
Endocrine system chart
Common pre/post fixes chart for med students
Types of stitches (???)
Learn programming
COLLEGE!
How to grow the fuck up (masterpost)
How to become an adult (masterpost)
Dorm essentials checklist
THIS DORM CHECKLIST!
What to do with your major
Read this before you join a Sorority/Fraternity
Deal with a hangover
Food to buy
Fix your leaky faucet
Remove a carpet stain
Organise your closet
More food to buy
WINTER SURVIVAL
FOOD BC WHY NOT
100 Ramen recipes
Triple Chocolate and Salted Caramel Cookies
Really nice recipes. Every hour.
Healthy, but tasty snacks
Apple pie inside a fucking apple
Disney inspired recipes
Deep dish mug cookie
Food hacks
Recreate food porn
More food porn recipes
How to effectively take notes
VIDEOS:
How to take colour coded notes (starts at 0:58) How to take notes and study tips (really like this video, and contains printables) How to effectively take notes in class Advanced Cornell Notes Taking notes in college & backpack essentials Study tips (starts at 1:58 ) Taking notes and studying Creating a study guide and printing notes (really helpful for how to print and organize notes) Taking class notes and studying for tests Outlining your textbook (starts at 0:30)
APPS:
Evernote: Clip web pages (good for research), and take notes. Dropbox: good for keeping documents, photo and videos in one place. Khan Academy: videosfrom maths and science to humanities. Digg: Daily news. CliffsNotes: study for tests, create quizzes, read summaries, good for english/humanities. Studious: a reminder for when homework and tests are due. Pocket: researching tool. EasyBib: Scan the barcode of the book and it creates a citation. iFormulas: formulas, rations, theorems. iTunes U: provides educational content for free.Also provides access to courses, and learn about different courses.
OTHER:
Effective note taking via University of Reading (contains printable guide) How to take notes at university via The Guardian Taking lecture and class notes via Dartmouth College (contains lots of resources too) Taking effective notes via howtostudy Taking notes via Harvard (pdf file - really useful and I recommend that you print this out and use it for reference) Creating a study guide via Utah State University (pdf file)

A lot of people are turning to using tablets or laptops to take their notes, for reasons that I won’t go into in this post. But, while there are lots of posts about taking handwritten notes, there don’t seem to be very many about taking notes using a laptop/tablet (I’ll refer to as digital notes from now on).
Set up folders for each topic. Create these folders before lectures/class and save your notes into the correct ones. It will keep all of your notes organised and easy to find. You might want to have different folders for lecture and reading notes. Develop a system which is intuitive for you.
Know the program. Choose which program you’re going to use to take your notes. There are lots of options available, including Microsoft Office. If you can’t afford Office, then you can look into (illegal) free downloads of it. If you have Office, you could also use Onenote. Alternatives include free programmes like Evernote which allow you to access your notes from anywhere on any device.
Get a template (M Office only). On Microsoft word, you can download different templates. See if there is a template that you can use for taking your notes. Alternatively, you can create your own template by adjusting the margins, font, size, etc. and saving your preferences. If you don’t want to use a template, you can just use the default settings.
Name the notes. Make sure that you name the notes so that you know what’s inside. On Microsoft word, when saving documents you can add tags. Then you can search these tags for any documents with that specific tag. I’ve found this to be a really useful organisational tool.
Do you need anything to take your notes? If you’re using a tablet, you can buy Bluetooth keyboards which will connect and can be quicker than typing on the screen. You can also buy a stylus which will let you write like you would with a normal pen; some devices also have the option to convert your handwriting to typed notes.
Get to know your keyboard. If you’re using a keyboard, then I suggest looking at this website which will teach you how to touch type.
Become familiar with keyboard shortcuts. Especially for things like bold, italicise, underline, highlight.
Downloads. If the teacher/lecturer puts up any material for the lecture download it. These are typically powerpoint slides. When I take notes next year, I will download these and split screen between word and powerpoint. Then I’ll be able to copy and paste material and diagrams straight from the actual powerpoint, speeding up my process.
Back up. Please, back up your notes on google docs. If your computer crashes you will have a backup of your notes that will be essential to studying! Again, for the people in the back, back up your notes!
Creating your notes. Use the technology to your advantage.
Use bold/highlight/italic. Make your heading and subheadings stand out from the rest of your text.
Use bullet points.
You can even make sub bullet points (like this) using the tab key to follow your line of thought/reason.
Highlight the important things; you could even use different colours for different things. E.g. yellow for important dates, blue for important quotes.
Develop an annotation style. For example, sometimes you might fall behind a bit, and miss a detail. When this happens to me I insert a series of dots into my notes, like this (……..) and I know that means I missed something so I can return to the recordings to find out what I missed. You could use question marks (?) to indicate something that confuses you that you need to do more reading on. There are lots of different symbols so you can develop your own system.
This also works with words. If you have certain words which you’re typing a lot then you can make them shorter and easier to type. For example, the word “participants” comes up a lot in my course, but I use “ps” because it’s shorter and quicker to type.
Note Taking Systems
The Cornell Method
The Cornell method provides a systematic format for condensing and organizing notes without laborious recopying. After writing the notes in the main space, use the left-hand space to label each idea and detail with a key word or “cue.”
Method
Rule your paper with a 2 ½ inch margin on the left leaving a six-inch area on the right in which to make notes. During class, take down information in the six-inch area. When the instructor moves to a new point, skip a few lines. After class, complete phrases and sentences as much as possible. For every significant bit of information, write a cue in the left margin. To review, cover your notes with a card, leaving the cues exposed. Say the cue out loud, then say as much as you can of the material underneath the card. When you have said as much as you can, move the card and see if what you said matches what is written. If you can say it, you know it.
Advantages
Organized and systematic for recording and reviewing notes. Easy format for pulling out major concept and ideas. Simple and efficient. Saves time and effort. “Do-it-right-in-the-first-place” system.
Disadvantages
None
When to Use
In any lecture situation.
The Outlining Method
Dash or indented outlining is usually best except for some science classes such as physics or math.
The information which is most general begins at the left with each more specific group of facts indented with spaces to the right.
The relationships between the different parts is carried out through indenting.
No numbers, letters, or Roman numerals are needed.
Method
Listening and then write in points in an organized pattern based on space indention. Place major points farthest to the left. Indent each more specific point to the right. Levels of importance will be indicated by distance away from the major point. Indention can be as simple as or as complex as labeling the indentations with Roman numerals or decimals. Markings are not necessary as space relationships will indicate the major/minor points.
Advantages
Well-organized system if done right. Outlining records content as well as relationships. It also reduces editing and is easy to review by turning main points into questions.
Disadvantages
Requires more thought in class for accurate organization. This system may not show relationships by sequence when needed. It doesn’t lend to diversity of a review attach for maximum learning and question application. This system cannot be used if the lecture is too fast.
When to Use
The outline format can be used if the lecture is presented in outline organization. This may be either deductive (regular outline) or inductive (reverse outline where minor points start building to a major point). Use this format when there is enough time in the lecture to think about and make organization decisions when they are needed. This format can be most effective when your note taking skills are super sharp and you can handle the outlining regardless of the note taking situation.
Example:
Extrasensory perception
definition: means of perceiving without use of sense organs.
three kinds
telepathy: sending messages
clairvoyance: forecasting the future
psychokinesis: perceiving events external to situation
current status
no current research to support or refute
few psychologists say impossible
door open to future
The Mapping Method
Mapping is a method that uses comprehension/concentration skills and evolves in a note taking form which relates each fact or idea to every other fact or idea. Mapping is a graphic representation of the content of a lecture. It is a method that maximizes active participation, affords immediate knowledge as to its understanding, and emphasizes critical thinking.
Advantages
This format helps you to visually track your lecture regardless of conditions. Little thinking is needed and relationships can easily be seen. It is also easy to edit your notes by adding numbers, marks, and color coding. Review will call for you to restructure thought processes which will force you to check understanding. Review by covering lines for memory drill and relationships. Main points can be written on flash or note cards and pieced together into a table or larger structure at a later date.
Disadvantages
You may not hear changes in content from major points to facts.
When to Use
Use when the lecture content is heavy and well-organized. May also be used effectively when you have a guest lecturer and have no idea how the lecture is going to be presented.
Example:

The Charting Method
If the lecture format is distinct (such as chronological), you may set up your paper by drawing columns and labeling appropriate headings in a table.
Method
Determine the categories to be covered in the lecture. Set up your paper in advance by columns headed by these categories. As you listen to the lecture, record information (words, phrases, main ideas, etc.) into the appropriate category.
Advantages
Helps you track conversation and dialogues where you would normally be confused and lose out on relevant content. Reduces amount of writing necessary. Provides easy review mechanism for both memorization of facts and study of comparisons and relationships.
Disadvantages
Few disadvantages except learning how to use the system and locating the appropriate categories. You must be able to understand what’s happening in the lecture
When to Use
Test will focus on both facts and relationships. Content is heavy and presented fast. You want to reduce the amount of time you spend editing and reviewing at test time. You want to get an overview of the whole course on one big paper sequence.
Example:

The Sentence Method
Method
Write every new thought, fact or topic on a separate line, numbering as you progress.
Advantages
Slightly more organized than the paragraph. Gets more or all of the information. Thinking to tract content is still limited.
Disadvantages
Can’t determine major/minor points from the numbered sequence. Difficult to edit without having to rewrite by clustering points which are related. Difficult to review unless editing cleans up relationship.
When to Use
Use when the lecture is somewhat organized, but heavy with content which comes fast. You can hear the different points, but you don’t know how they fit together. The instructor tends to present in point fashion, but not in grouping such as “three related points.”
Three Examples:
Example 1:
A revolution is any occurrence that affects other aspects of life, such as economic life, social life, and so forth. Therefore revolutions cause change. (See page 29 to 30 in your text about this.)
Sample Notes:
Revolution - occurrence that affects other aspects of life: e.g., econ., socl., etc. C.f. text, pp. 29-30
Example 2:
Melville did not try to represent life as it really was. The language of Ahab, Starbuck, and Ishmael, for instance, was not that of real life.
Sample Notes:
Mel didn’t repr. life as was; e.g., lang. of Ahab, etc. not of real life.
Example 3:
At first, Freud tried conventional, physical methods of treatment such as giving baths, massages, rest cures, and similar aids. But when these failed, he tried techniques of hypnosis that he had seen used by Jean-Martin Charcot. Finally, he borrowed an idea from Jean Breuer and used direct verbal communication to get an unhypnotized patient to reveal unconscious thoughts.
Sample Notes:
Freud 1st – used phys. trtment; e.g., baths, etc. This fld. 2nd – used hypnosis (fr. Charcot) Finally – used dirct vrb. commun. (fr. Breuer) - got unhynop, patnt to reveal uncons. thoughts.
My Study Method
My post 10 types of planners got way more notes than I expected. So today I will show you how I prepare for my exams. The method I’m going to explain is the one I’ve developed over the years and got me to get all A’s in high school. From taking notes, to nailing your exam.
1. HOW TO TAKE NOTES
1.1. Sit in the front of the classroom Don’t give a f**k if you look like a dork. Make sure you can see the blackboard clearly. You should be able to look at your teacher and the other way round. In case my experience is not enough: Studies show that those who “sit in the front and center (middle) of the classroom tend to achieve higher average exam scores”. Plus, your teacher will know who you are and will be aware that you pay attention in class.
1.2. Ask questions Don’t be afraid of asking questions. This took me years. Your teacher won’t think your question is stupid - in fact, it is their job to make sure everybody learns whatever they are supposed to teach. AND even if it looks as if the whole class has already understood the lesson, trust me, they haven’t.
1.3. Don’t write every word the teacher says There’s just no point in doing such thing. Contract words and use symbols and doodles. Once you get home, fair-copy your notes if they are not clear enough (or at least, re-read them). Otherwise, when you try to study with your notes a few weeks/months later, you won’t understand a thing.
1.4. Clarify your notes What did you just write down? Was it something that didn’t appear on the book? Was it an explaination of what the book says? Some info you should expand? Use a color code or symbols to clarify your notes. It doesn’t take time but will save you time in the future.
1.5. Compact notes Write with tiny (but legible) handwriting. It is quicker, tidier, and it saves paper. Also, write in two or three columns.
1.6. How to stay motivated to take good notes Last year I told one of my best friends (who is one grade bellow me) that I would give her all my notes at the end of the year. People normally dream of setting fire to their notes (and at least in Spain, people actually do that). But this other option (giving away my notes) was good for her and for me, since whenever I felt like writing carelessly, I’d think, “she won’t understand these notes, I have to do it better”.
2. PRE-STUDYING
Start pre-studying the very first day of class.
2.1. Active reading
Everytime I see someone whose book is entirely highlighted I’m like “why don’t you just dip it in a bucket of yellow paint?”. Seriously, stop.
Underline only the key words, not the whole sentence.
Use a different color (at least) for each paragraph.
When you read a paragraph, open a key in the margin and summarize what that paragraph is saying. Use between 1 and 10 words. Write as small as you can.
Right after you finish with a page, do an outline of the whole page in order to make sure that you have understood what you’ve just read. How? Scroll down.
2.2. Make it visual
Outlines, mindmaps, graphics… it really depends on the subject. All I know is that I just CAN’T study from a block of text.
Separate coordinated sentences and link them with symbols.
Use bullets or numbers and indent.
Color is not decorative. The same color links together different ideas.
Pink highlighters are cute but they don’t highlight at all.
Small handwriting and columns are your friends.
Highlight just the KEYWORDS. About 4-8 words per page.
Don’t use the same template or style on every page, unit or subject.
Number your pages.
Here you have a messy and a tidy example:


3. STUDYING
3.1. When should you start studying?
When I was in high school, I used to start studying one or two weeks before the exam. A few days before when I was too busy. The day before when I was about to jump out the window.
Divide whatever you have to study in equal parts to make it more approachable.
Try to organize yourself so that the day before the exam you don’t have to study because you already know everything (and you just need to revise a little bit).
3.2. Studying (and by studying, I mean memorizing) Once you have read it and understood it, you have to memorize it. My favourite quote is: “Don’t practice until you get it right. Practice until you can’t get it wrong.”
These are my methods. I also recommend reading this article for more. Use the method that works best for you or all of them to ensure you’ve got it.
Write your mind-map again and again and again. Don’t change the placement of each concept in your mind-map or you’ll become confused in the end.
Translate words into drawings. Translate your drawings into words. Repeat. Repeat!
Read a little bit, try to explain it out loud as if you were a teacher. Repeat endlessly.
Make a story that helps you fully understand what goes next and WHY.
3.3. Keywords list This is the spine of my whole studying method. So basically, reduce each sub-topic to ONE word. Then reduce each topic to ONE word. Study those words by heart.
In the exam, just write down your list of keywords and you will easily remember each topic and sub-topic.
4. EXTRA TIPS
4.1. When studying a list of words or names It is really important to know how many words there are.
Make a sentence with the first letter of each word.
Make a song. You can use a jingle you already know.
Picture a scene which contains all the words.
4.2. IMPORTANT!
Highlight, bookmark and make a list of those concepts that you usually forget or make mistakes, so it is the first thing you see (and revise) the next time you study.
The night before the exam, write in a little piece of paper that thing (an important formula, something that you always forget, your keywords list…) and that’s the only thing you should revise the following day.
Talk to older students and ask them for their old exams. Your exams will probably be different, but if the teacher is the same, they’ll be similar.
5. HOW TO NAIL AN EXAM
First of all, you should take a look to the Text Anxiety Booklet. It contains a lot of information for the ones who get really anxious.
5.1. Appearance matters My teachers always say that when they are correcting our exams, illegible handwriting really pisses them off. Since they are humans, that attitude towards your exam will be unconsciously reflected on your mark. On the other hand, when they get to a visually appealing exam, they are more compassionate. Conclussion: MAKE YOUR TEACHER’S WORK EASIER.
Use your best handwriting.
Write your name on every page (if you are asked to do so).
Leave margins.
Separate your paragraphs.
Indent when necessary.
Number your pages.
5.2. Don’t ever leave a question in blank Ever. Every little point adds up to you final mark, and a blank question means 0 points. If you write something and it is wrong, you simply made a mistake. But if you don’t answer, your teacher might think that you didn’t do it because you didn’t study. However, remember that your teacher is older and wiser than you, and will notice if you are trying to fool them.
In some tests, mistakes subtract points. In that case, you’d better leave the questions you don’t know in blank unless you like taking risks.
5.3. What if you go blank First of all, wait a minute and take a deep breath. This is not a waste of time because it will actually help you do better. Now, do the rest of the exam and come back later. Then, if you still can’t remember, try retracing not what you studied but what you were doing while you were studying. Maybe you were drinking tea, maybe your father came into your room or maybe you heard something on the street. And remember that you control your breathing, and your breathing controls your feelings.
5.4. An exam is not a race I guess some people believe they’ll receive a prize if they are the first one to hand in their exam. Those people have all of my disapproval. Use all the time your teacher gives you and always, I mean ALWAYS, revise your exam before handing in it. Revise. Your. Exam. Did you follow the instructions correctly? Did you answered all the questions? Are there spelling mistakes?
That’s it. I hope you found it helpful.
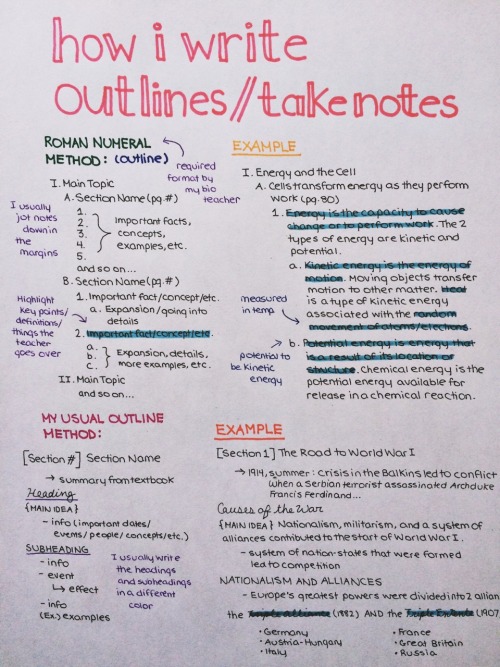
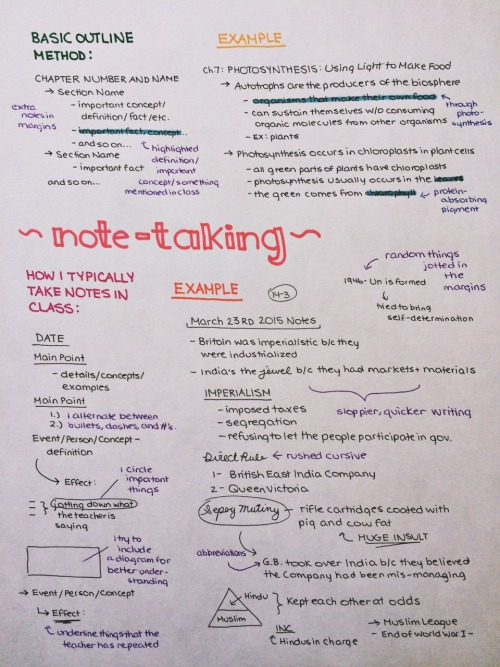
How I write outlines/take notes, for those of you that were asking :)