Latest Posts by marathon-notasprint - Page 2

eEEYYYYY the studyblr community has some amazing note taking methods and so i wanted to put a bunch of them in one place :]
flashcards:
fc: cute language ones
fc: biochemistry paths
fc: disease summaries
fc: pretty biology ones
fc: the leitner methods
fc: ap us history ones
fc: o chem + color code
alternative 2 flashcards
sticky notes:
printing on sticky notes
take notes from textbook
plot summaries [literature]
many ways to use post its
english reading summaries
character maps 4 english
outlines:
color coded + neat
cornell + color code
digital cornell notes
learn from mistakes
super duper cute
outline with onenote
the margin method
in class / lectures:
for all classes + color
spaced out + pretty
for all classes / hw
advice @ infographic
2 notebook method
organized + colors
reference sidebar
method infographic
specific classes:
sciences + maths
history methods
learning types
sketchnotes:
introduction to it
cute symbols to use
+adorable symbols
+insp @ nice symbols
how to draw ribbon
illustrating ur notes
over the top amazing:
homemade textbook
digital study guides [1]
revision study guide
mini moleskine guide
digital study guides
handwritten studying
masterposts!!!
productive summers
starting a study blog
time managements
succeed @ school
ap world history
web resources
ap psychology
bullet journals
ace ur exams
stress reliefs
annotations
essay writin
printables
sat help
+more
hope this helped u all with taking notes!!!!!! xoxo sareena
Back To School: Stationery
PENCIL CASES:
Pencil cases by Paperchase
Lani Ang three layer pencil case
Large pastel colour pencil case
IPOW canvas pencil case
IPOW floral canvas pencil case
Emma Bridgewater pencil case
PLANNERS:
WHSmith black A6 diary - Week-to-view
WHSmith black A6 diary - Page-to-view
‘This Week’ planner by Knock Knock
‘5 Days A Week’ desk jotter by Knock Knock
Planners and organisers by Paperchase
NOTEBOOKS:
Oxford Campus notebooks
10 subject notebook by Paperchase
Decomposition notebooks
Pukka Pad notebooks
Muji notebooks (B5)
Muji notebooks (A5)
PENS:
Pilot V5 Hi-tecpoint 0.5 pen (black)
Uni-ball eye fine tip roller-ball pen (black)
Bic medium ballpoint pen (black)
Muji 0.5 gel ink pens
Muji 0.38 gel ink pens
PENCILS:
Muji box of 12 colouring pencils
Staedtler colouring pencils (24 pack)
Staedtler HB pencils (5 pack)
PaperMate mechanical pencil (12 pack)
Paperchase dual ended colouring pencils (12 pack)
Paperchase graphic pencils (10 pack)
FINELINERS AND FELT-TIPS:
Stabilo fineliners (20 pack)
Stabilo felt-tips (20 pack)
Staedtler triplus fineliners (20 pack)
Staedtler triplus felt-tips (20 pack)
Paperchase fineliners (12 pack)
HIGHLIGHTERS:
Stabilo boss highlighters (8 pack)
Stabilo boss highlighters (4 pack)
Staedtler highlighter (8 pack)
Sharpie highlighter (4 pack)
Paperchase cat highlighters (5 pack)
Paperchase panda highlighters (5 pack)
MISCELLANEOUS:
Paperchase tube map memo block
Paperchase sticky note box
Dot and stripe washi tape
Allydrew washi tape
Tipex correction fluid
Post-it notes 3″x 3″ (5 pack)
Index cards (white) 3″x 5″


German vocabulary list: Colors
rot (red)
rosa/pink (pink)
blau (blue)
hellblau (light blue)
dunkelblau (dark blue)
grün (green)
gelb (yellow)
orange (orange)
braun (brown)
beige (beige)
violett (violet)
lila (purple)
weiß (white)
grau (grey)
schwarz (black)


Ladies and gentlemen, new guest post on the blog
5 Proved Tips for Witing a Fresh Book Review
“Do you know how to write a fresh book review? You may have already faced with this unordinary task but we have some tips for you to do it at your best. Some basic things you should know is that a book review is intended to describe, analyze and evaluate. It also should…” Read More>>
The author of the post is http://youreasystudy.tumblr.com/!


October 2015 Monthly Pastel Planner Printables
By request! Comes in the 5 colours pictured above (peach, pink, lilac, blue, mint). There’s two versions. One where the week starts with Monday and one with Sunday.
Download from Google drive for free (PDF files):
Starts with Monday (October 2015)
Starts with Sunday (October 2015)
My other pastel planner printables:
Weekly
Daily
Hope you enjoy them! If you share pictures with them here, tag me with #studyblrbunny.
Masterpost
I’ve seen a lot of masterposts lately, but this one is the first I’ve ever done. Feel free to add to it, or make suggests for things I should add. Links will be under certain categories, so feel free to skip to the one you feel like you need. If you see something you posted and you’d like me to take it off, please let me know.
Study Tricks/Tips/Advice
1. Tips from A+ students
2. Find Your Study Style And Methods That Work For You
3. How To Study When You Don’t Feel Like It
4. Science Backed Study Tips
5. More Learning/Studying Techniques
6. Whole Page Dedicated To Studying/Organizing
7. Homework Help
8. Tips For Effective Studying
9. How To Study Like A Straight A Student
Note Taking
1. Tips For The Lazy Student
2. Info On Cornell Notes
3. Note Taking Masterpost
4. Good Note Taking Summary/Tips
Test Prep
1. How To Prepare For A Test
2. Free SAT/AP Prep Resources
Health Related
1. How To Avoid A Breakdown
2. Books Dealing With Mental Illnesses
When You Need To Read
1. How To Read Shakespeare/Old English Texts {1} {2} {3}
2. Assigned Reading Tips
3. How To Read Difficult Books
Course Specific Help- Math
1. Square Root Calculator
2. Cube Root Calculator
3. Solve Any Equation {1} {2}
4. How To Multiply Big Numbers
Course Specific Help- Chemisty
1. Chemical Equation Balancer
2. Chemistry Help Motherload (Textbooks/Resources/Help/ETC)
3. Tips For Studying Chemistry
Websites/Apps
1. Final Grades Calculator
2. Feed Hungry People And Improve Your Vocabulary At The Same Time
3. Legal Textbook Websites/Help
4. Editor That I Use For All Writing/Typing (And it’s wonderful)
5. Note Taking Website (With App)
Language Learning
1. Duolingo (I use this personally and it’s awesome)
2. German Colors List
3. Language Learning Masterpost
4. Learn 8 Chinese Words In The Cutest Way
5. Language Learning Websites
6. Tips For Self Teaching Japanese
7. Sign Language People Commonly Use
8. A Faster Way To Learn A Language
Sleep
1. Sleep Tips
2. How Long Should You Sleep For?
3. Successful Sleep Habits (Infographic)
Motivation
1. 100 Reasons To Study
2. Motivation Masterpost
3. Motivation Quotes (Via Google)
Time Management
1. Advice Graphic/Comic
2. The Pomodoro Technique
3. Time Management Masterpost
4. How To Manage Your Time Effectively
Music
1. Classical Study Playlist
2. Hit The Books Playlist {1} {2}
3. Playlists Masterpost
4. Mini Masterpost Of Playlists


My Study Method
by futurecomposer
Notes and processing info:
i write my notes with Google Drive / Docs (android / itunes)
before the lecture: First of all I write the textbook notes and maybe articles about the subject, that way, when I go to the lecture, I already understand the topic. If there’s available slides, print them, so you can annotate on them later.
during the lecture: Take as many notes as you can, but also write about the most important stuff. For this I use paper. I feel like It’s easier to link stuff, draw diagrams, etc. … It doesn’t matter if your notes are messy, you’ll rewrite them later. Remember: if it’s in the blackboard, it’s because it’s important.
after the lecture: After the lecture I write my lecture notes in the previous document. Now it’s time to get fancy: use bold, italic,, both of them to indicate keywords and/or important phrases. But be careful: don’t overuse them, or they will become useless.
At this point you should have all the information you need for the exam perfectly summarised in a doc.
Summarising and flashcards
bullet points: It’s time to make another doc. This time we’ll resume the information in bullet points. The goal is to have clear, concise, brief facts.
summary cards: Here comes the most important part. Summarise one topic in one flashcard. The point is to really condense the information and see what’s most important. Fill the flashcard with info, don’t get cut back by aesthetics. The previous doc is your guide.
This system’s point is to manage and work the information, get familiar with it, then find the most important concepts. This way, you have actively worked with it, and have more tendency to remember it.
Note taking masterpost:
An anon requested this today. I though I had already made one, but apparently not.
General note taking and guides:
Combining lecture and reading notes
Resources about making chapter outlines
Recognising key points in a lecture / reading (for efficient note taking)
10 tips for good note taking in lectures
Guide to note taking (the major approaches and techniques)
What to do after you take your notes
Organising a notebook
Taking notes that work (By Dustin Wax)
Top note taking tips
An example of me using cornell notes
Visual / Pretty Notes:
Visual guide to illustrating notes
How to make your notes prettier!
Pros and cons of pretty notes
Guide to colour coding
Guide to my graphic notes
How to make notes cute and neat
Inspiration: 1 / 2 / 3 / 4 /
Electronic Note taking:
Guide to taking typed notes
Handwriting versus typing your notes
Organising your typed notes
Note taking apps

The Best Study Techniques:
I’ve recently come across a 2013 study which aimed to compare the efficiency of different study techniques.They evaluated whether the benefits of the techniques generalised across learning conditions, student characteristics, materials, and criterion tasks. Here is a summary of their results:
Least Effective Study Techniques:
Highlighting — including underlining textbooks and other materials
Rereading
Summarisation
Keyword mnemonics — the use of keywords and mnemonics to help remind students of course material
Imagery use for text learning — creating mental images to remind students of material
Moderately Effective Study Techniques
Elaborative interrogation — uses “why” questions to get students to make connections between new and old material.
Self-explanation — prompting students to provide their own explanations for problems while learning material
Interleaved practice — mixing different kinds of problems or material in one study session
Highly Effective Study Techniques
Practice testing — any form that allows students to test themselves, including using actual or virtual flashcards, doing problems or questions at the end of textbook chapters, or taking practice tests.
Distributed practice — studying material over a number of relatively short sessions.
(Source)
Giving Amazing Presentations!
These are my tips for giving really good presentations in class! It will be slightly more geared towards history, english, etc. and some of the tips might not apply to science classes, but hopefully this helps.!
Presenting Well:
Know what you are talking about. When you are giving a presentation, you should be an expert in what you are talking about. Study the topic like it’s your job.
If you are working with a partner, still make sure you know it all! When I do partner presentations, this is what I do. Decide who is going to do each part of the presentation. This is the part that you should know backwards and forwards. But! You should also have a good amount of knowledge about your partner’s topics. If one of you falters or forgets something, the other can back them up. Also, this helps to make you look more cohesive and less like you just split it in half.
Be able to answer questions. This ties into my last point. If a classmate or a teacher asks you a question and you have no idea, it doesn’t look good. You should know more information than just what you’re presenting.
Don’t read from notes. If you stand up and just read from a page, your class might as well be reading this information from a textbook. If you can, don’t use any notes at all. If you absolutely need them, make them super short jot notes, not full sentence pages of notes.
Organize your slides in a way that makes sense. Start with background information, then state your thesis, then get into your arguments and more detailed information. Don’t put your thesis at the end, or skip over the background information.
Include a conclusion at the end of your presentation. A presentation is basically a verbal essay, so you should be including all of these parts. Restate your thesis and quickly sum up the reasons that you talked about in the presentation. This will help everyone in your audience to understand what you discussed.
Dress up a bit and try to look really good. I personally believe that a lot of confidence can come from the outside. Looking good and being comfortable with what you’re wearing will make you more confident. Also, a lot of teachers want to see that you made an effort to look professional for a presentation.
Talk to the class like you’re having a conversation. Obviously, you don’t want to be too relaxed and seem like you don’t know what you’re talking about. But it is really helpful to use your normal language and tone, throw in a couple jokes, and just act normal! It’s always really weird when someone turns into a robot when they are giving a presentation, so try to avoid that if possible.
Practice in front of someone! This will help you avoid looking awkward and help you go at a normal speed. Also, they can tell you if there was a part that they didn’t understand or anything like that. Try to choose someone objective, that won’t lie to make you feel better.
Time out your presentation. You have to time out your presentations before you do them. It’s not fair to other presenters and to your class if you go way over the time limit. Time yourself reading through the presentation, then again when you present in front of someone. Maybe leave a bit of time at the end for questions, too.
Making Good Visuals:
Use something simple. Unless your teacher suggests otherwise, just use slides or something simple like slides. Unless you are really good with these kinds of programs, when you try and do something like a video or a Prezi, its way more likely that it will look unfinished or crazy. I personally hate Prezi, because it’s way too hard to follow.
Use a built in slides theme. Again, this might not apply to you if you’re really into graphic design, but for the most part, stick to this rule. When you try and mix your own colours and patterns and fonts, it can tend to look really busy. Try to stick with a preset theme.
Do not have full sentences. You should not have more than 10 words on your entire slide, if that. A really good photo, political cartoon, graph, or other graphic says way more than an exact copy of the words you’re already saying. Your slides are a visual to back you up, not the main focus. If your class has to take notes on your presentation, this might not apply.
Don’t use a white background. Pure white makes your eyes hurt. Change the background colour to a really pale grey, one shade lower than white. This will help your audience focus on the slides better.
Make sure your visuals are working. Ask your teacher if you can double check that your slides are compatible with their computer, or at least check it on a computer at your school. Especially if your school uses Mac and you use Windows (or vice versa). Also, check that your videos and audio work!

hey guys, this is a masterpost requested by loveathenaa about notes and studying basically!!!
notes
taking notes from a textbook
an alternative to flashcards
pretty notes!!!!
AMAZING mind maps!!
how 2 make banners
creating better flashcards
my fav online flashcard website [there’s also an app for ur phone]
note taking methods
illustrated study methods!!!!
some more
more note taking stuff bc i just can’t get enough B-)
printables!!!!
how 2 take lecture notes
annotating!!!
studying
get motivated!!!
relax whilst studying
study playlists by me!!!!
reasons to study
my fav focusing app
how 2 study
memorisation and things
101 study tips!!!
studying biology
when ur having a bad day
productive study breaks
self-study resources
khan academy + on youtube
physics
japanese
other languages <3
more and more languages yaaas
crash course videos!!!
math help
masterpost!!!
mythology!!!!
check out 3 minute philosophy
the school of life which is my fav ever!!!!
sparknotes which is another fave
gradesaver
bbc bitesize
hope this helps u guys out a bit also if u need anything or want to request a masterpost, please message me!!! -helena xx
How to Take Notes: from a Textbook
(Be sure to change the post type from link to text post when you reblog, if that’s what you want to do)
This method is best suited for textbook or article notes, and is a version of revised notes. It is also well suited for books you plan on returning to the bookstore or books you have rented, as it does not involve writing directly in the book itself.
First, you’ll need to find a notebook, and the pens you like the best. My favorite notebooks to work with for note-taking, especially for my “revised” notes, are the Moleskine, hard or soft cover, in size extra large. For this specific class (Intro to Gender and Women’s Studies), I decided that lined pages would suit my needs better. For my math, engineering, and science classes, I usually opt for squared paper, as I draw in lots of diagrams and graphs.
My favorite pens ever are Staedtler Triplus Fineliners, so even though they show through the pages a little bit, I still choose to use them. I just love the way they write. I usually write out my notes themselves with a Pilot G2 05 with black ink, as it writes with a finer line and doesn’t bleed through quite as much.
I usually try to set up my notebooks about a week or so before class starts, that way it’s ready to go on my first day of class.

You’ll want to start off by setting up your notebook. On my first page, I put my course code for my university, as well as the course title.

Next, and this is perfectly optional (I just like the way it makes the book look, especially at the end of the semester), I include some sort of related quote to the course. For my engineering courses (which are related to my major), I put a different quote at the beginning of each section. But as this is a two-month long course during the summer, I opted for one quote by Mohadesa Najumi at the beginning of my book.

Next I set up my table of contents and include a page with basic course information. As this course is all online, my course information just included the start and end dates of the course, what time content is posted and on what day, and the name of my professor. For my usual courses, I will include the days of the week the class meets on and where, TA names and contact info, as well as posted office hours for my professors and TAs and tutoring hours either in the library or in the College of Engineering.

Next is one of the things I’m most proud of.
While I religiously use my Erin Condren planner to map out my days, weeks, and months, I have found throughout my college experience that including monthly views for the months my class ranges has been helpful. This way, there’s no sifting through the multiple colors I have in my planner, and everything related to that class is in the same notebook.
On this calendar I include start dates of the class, the end date, the dates of exams or quizzes, assignment deadlines, office hours, etc.
For this course, as I just started a few days ago, I don’t have a lot of dates or information, so my calendars are still very empty.


Next up I go to my weekly overview. At the beginning of each week, I set up a weekly layout, and I include a list of assignments, tests, quizzes, tasks, projects, etc that need my attention throughout the week, and I place the days I plan on doing them or the days they need turned in onto the weekly layout.

Now you’re finally ready to get into taking the notes.
Gather your book, some sticky notes, and your favorite pen or pencil.
I color code my stickies so that the “revision” process later goes a bit smoother. In this case, I’m using blue to denote something interesting, intriguing, or thought provoking, greenish-yellow to represent the facts or important concepts, and pink for important vocabulary words and their definitions.

Read the selection once.
As you read along the second time, write notes on your stickies, and place them in a place of relevance directly on the page in the book. Just make sure you don’t cover up anything you need to keep reading.


Now, once you’ve read all the material in questions (you can choose to break it up however you want, but since Chapter 1 was assigned for the week, I’ve elected to break it into chapters), carefully remove your stickies one by one and lay them out on a flat surface. This is when having a separate color for vocab can be helpful, as I sometimes put all of my vocab at the beginning or end of a section, especially if the section of reading was particularly large.
Organize your stickies in an order that makes sense to you, and use this order as your basis for transferring those notes into your notebook. The order you choose can just be lumping them under similar headings. Some classes even lend themselves to a nice chronological order. Whatever you choose, just make sure it’s something that will make sense to you when you come back to it in the end.

Okay so up there I wasn’t following my own advice, I just thought I would include the picture because my handwriting looks nice…

Now organize the stickies!

Now you just start writing everything from the stickies into your notebook. I like to take each category or subgroup and put them in the book on the facing page, then put them back in my textbook as I finish with each post it.

Moving on to the next category.


Before you know it, you’ve written all of your stickies into your notebooks.

Now you’re revved up and ready to go. You can either keep going and make a note summary page (which I’ll show you next week), or you can leave it. These will also be helpful when reviewing for tests and quizzes. You can highlight or underline, or use even more stickies (which is what I usually do) as you review.
Well, that’s all I have for you right now. Happy studying!
(To view this post on wordpress, click here)

STUDY METHODS (part 1)
i’ll be posting soon part 2 (Study methods part 2 here)
*Please excuse my english if necessary*
Puedes encontrar esta misma imagen en español aquí
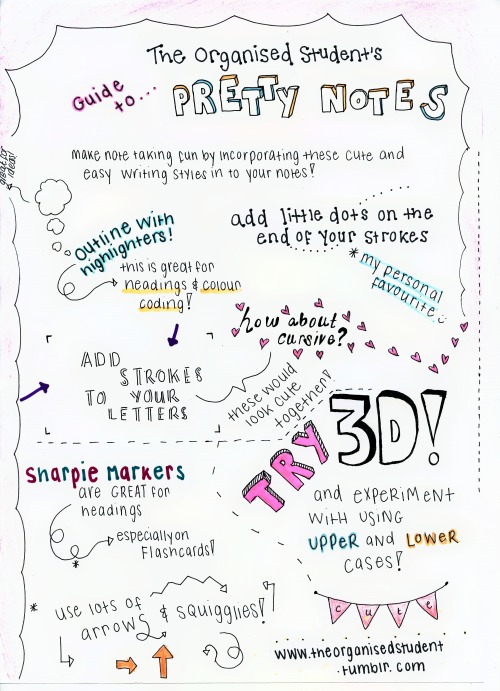
2/4/2015 // I love experimenting with pretty, new hand writing styles for my study notes! I made this info-graphic and scanned it in to show you some of the styles I am loving right now.


There are three major approaches to note taking, each of which will be outlined and described in this post:
Outlining:
Outlining is an effective way to capture the hierarchical relationships between ideas. In a history class, you might write the name of an important leader, and under it the key events they were involved in. Outlining is a great way to take notes from books, because the author has usually organized the material in a fairly effective way, and you can go from start to end of a chapter and simply reproduce the same structure in your notes. Place major points farthest to the left. Indent each more specific point farther to the right.
The advantage of this is that level of importance is indicated by distance away from left margin.
For lectures, outlining has limitations. The relationship between ideas isn’t always hierarchical, and the instructor might jump around a lot.
Requires more thought for accurate, understandable organization and, therefore, cannot be used during lectures that move too quickly.
Mind-mapping:
For lectures, a mind-map might be a more appropriate way of keeping track of the relationships between ideas.
In the centre of a blank sheet of paper, you write the lecture’s main topic. As new sub-topics are introduced, you draw a branch outward from the centre and write the sub-topic along the branch. Then each point under that heading gets its own, smaller branch off the main one. When another new sub-topic is mentioned, you draw a new main branch from the centre.
The thing is, if a point should go under the first heading but you’re on the fourth heading, you can easily just draw it in on the first branch. Likewise, if a point connects to two different ideas, you can connect it to two different branches.
If you want to neaten things up later, you can re-draw the map or type it up using a program like FreeMind, a free mind-mapping program.
If you want to make your mind-maps memorable, and visually appealing, consider using different colours, and incorporating images/diagrams.
Mind maps can be used for just about anything in your degree! A mind map can help you:
Outline your ideas on a subject
Organise your thoughts
Visualise a whole concept
Take and review notes
Plan an essay
Revise for your exams
Here are some advantages and disadvantages to mindmaps:
Mindmaps are adaptable - they can be used for lectures; note-making from books; essay plans etc. as well as less structured tasks.
They are easy to add ideas later, at any time.
They can help you focus on the links and relationships between ideas so you don’t just have disconnected facts.
They can be personalised with pictures and symbols to make things more memorable.
They are a useful tool for condensing lots of information – e.g. a whole topic into a mind map poster, to aid revision.
You can’t incorporate large chunks of text.
You have to stick to the rules of mind mapping to get the optimum benefit from the tool.
Creating the map may take time. However, this will help you to review or recall information and will check your understanding.
When you’ve personalised your map, it can be difficult for others to understand.
Cornell Notes:
About a quarter of the way from the bottom of a sheet of paper, draw a line across the width of the page. Draw another line from that line to the top, about 2 inches (5 cm) from the right-hand edge of the sheet. You’ve divided your page into three sections. In the largest section, you take notes normally — you can outline or mind-map or whatever.
After the lecture, write a series of “cues” into the skinny column on the right, questions about the material you’ve just taken notes on. This will help you process the information from the lecture or reading. In the bottom section, write a short summary of the material you’ve covered.
Typing Your Notes:
Set up folders for each topic. Create these folders before lectures/class and save your notes into the correct ones. It will keep all of your notes organised and easy to find. You might want to have different folders for lecture and reading notes. Develop a system which is intuitive for you.
Know the program. Choose which program you’re going to use to take your notes. There are lots of options available, including Microsoft Office. If you can’t afford Office, then you can look into (illegal) free downloads of it. If you have Office, you could also use Onenote. Alternatives include free programmes like Evernote which allow you to access your notes from anywhere on any device.
Get a template (M Office only). On Microsoft word, you can download different templates. See if there is a template that you can use for taking your notes. Alternatively, you can create your own template by adjusting the margins, font, size, etc. and saving your preferences. If you don’t want to use a template, you can just use the default settings.
Name the notes. Make sure that you name the notes so that you know what’s inside. On Microsoft word, when saving documents you can add tags. Then you can search these tags for any documents with that specific tag. I’ve found this to be a really useful organisational tool.
Do you need anything to take your notes? If you’re using a tablet, you can buy Bluetooth keyboards which will connect and can be quicker than typing on the screen. You can also buy a stylus which will let you write like you would with a normal pen; some devices also have the option to convert your handwriting to typed notes.
Get to know your keyboard. If you’re using a keyboard, then I suggest looking at this website which will teach you how to touch type.
Become familiar with keyboard shortcuts. Especially for things like bold, italicise, underline, highlight.
Downloads. If the teacher/lecturer puts up any material for the lecture download it. These are typically powerpoint slides. When I take notes next year, I will download these and split screen between word and powerpoint. Then I’ll be able to copy and paste material and diagrams straight from the actual powerpoint, speeding up my process.
Back up. Please, back up your notes on google docs. If your computer crashes you will have a backup of your notes that will be essential to studying! Again, for the people in the back, back up your notes!
Creating your notes. Use the technology to your advantage.
Use bold/highlight/italic. Make your heading and subheadings stand out from the rest of your text.
Use bullet points.
You can even make sub bullet points (like this) using the tab key to follow your line of thought/reason.
Highlight the important things; you could even use different colours for different things. E.g. yellow for important dates, blue for important quotes.
Develop an annotation style. For example, sometimes you might fall behind a bit, and miss a detail. When this happens to me I insert a series of dots into my notes, like this (……..) and I know that means I missed something so I can return to the recordings to find out what I missed. You could use question marks (?) to indicate something that confuses you that you need to do more reading on. There are lots of different symbols so you can develop your own system.
This also works with words. If you have certain words which you’re typing a lot then you can make them shorter and easier to type. For example, the word “participants” comes up a lot in my course, but I use “ps” because it’s shorter and quicker to type.
Choosing between typing and handwriting:
Handwriting Notes:
Is creative; colour/ highlight/draw
Can help memory
Lots of experience using the technique
Can revent distraction
Same format as exams
Lots of paper; bulky
No back up
Environmenta
Difficult to transport
Can be a slow, ling progress
Typing Notes:
Quick; can keep up with teacher
Easy to transport; all ntoes on a single memory stick
Can create back up copes
Can be printed to have a digital and paper copy
Paper doesn’t have to be used; environmentall friendly
Add coliur/highlithg/etc.
Easily shared with other people
Different fonts can make it easier for people with dyslexia
Laptop may be too heavy to take to class
Not everyone has a laptop; expensive
Battery life might not be a suitable for a full day of classes
Can be less memorable
PLEASE MAKE A REAL COLLEGE TIPS POST BC I WAS TRUSTING THE ONE FROM THE FIRST YEAR UNTIL NOW
minimize gaps in your schedule if you’re commuting unless you work better on campus, in which case schedule large gaps and stay on campus all day
use academic advising services as early as possible to formulate your post-grad plan. don’t leave it until third or fourth year and risk missing prereqs, work/volunteer experience or references
networking sucks ass but guess what? you have to do it. figure out what your classmates are doing, who they’re speaking to, etc
make sure your profs know you. sit near the front, see them during office hours (make up questions if you have to), attend events, pick their brains. you might get an academic reference out of it or even a grad student position
you most likely have an online portal. visit it hourly. leave it for even a day and you will miss something
find out what textbooks you need before the semester starts and download the e-book, buy it used, whatever. just don’t fuck yourself over within the first couple weeks waiting for your book to arrive
read your syllabus very carefully. set all dates in your phone with an alarm days prior
get credit audits every year to make sure you’re on track to graduating when you anticipate
don’t take evening classes. you’ll never get anything done prior to class like you planned. ever.
Got an Essay to Write?
Here’s how to use up space when you are just absolutely done with life
-make all periods a font size or two up from the one you’ve been directed to use
-put two spaces after every period
-WATCH YO COMMAS you’re prob missing fifty of them
-2.15 space it
-MLA format the header
-use “such as” instead of “like”
-use “therefore” or “as a result of” instead of “so”
-add a space after every indent
-make the margins on your paper a TINY bit bigger
-get rid of all contractions
-see that word that’s so close to being on the next line? put it on the next line
*keep in mind that one or two of these may conflict with the essay’s instructions
*don’t forget to take a break and breathe some non-recycled air and close your eyes and love yoself <3
this has gotten me through several papers so i hope this helps. reblog this please, save a grade and some sanity


bi·ol·o·gy \bī-ˈä-lə-jē\ noun - the branch of knowledge that deals with living organisms and vital processes
I’ve noticed that there are quite a few younger studyblrs and since biology is usually the first high school science students take, I thought I’d make a post on how to study for it as it is my favorite subject.
1. Use Diagrams
Biology textbooks are full of diagrams and they’re there for a reason. Always look over the diagrams and copy ones on important topics (e.g. photosynthesis, taxonomy) into your notes.
2. Memorizing & Understanding
I have heard many people say biology is just memorization, but it’s really not that simple. There is a lot of memorization involved for vocabulary and basic information, but biology is also full of processes (e.g. cellular respiration, evolution). You cannot just memorize the steps, you must fully understand what purpose each step serves. Many tests have short answer or essay portions and there’s no way you can answer them by just memorizing the steps of a process without understanding them. I recommend drawing out diagrams and mind maps for understanding processes and cycles as that really helped me. Once you can teach someone else how that process/cycle works, then you really know it.
3. Color code
Color coding is useful for many subjects including biology. Color code your diagrams (it always comes back to the diagrams) and graphs as it makes looking back over your notes much easier and it keeps things organized and easy to study which is important since there are many complicated processes and cycles (e.g. DNA replication, transcription, & translation) that can get confusing if drawn all in one color.
4. Pay attention to labs
You’ll probably do quite a few labs during your time taking biology. Labs serve to let you see concepts in action for yourself which can really aid understanding. Always record data down in your lab notebook and do the conclusion questions. The conclusion questions gauge how well you understand the labs. Most importantly never ever record results you didn’t get. A lot of times (especially in basic high school biology), you will go into a lab with a pretty good idea of what will happen, but if your results don’t match your hypothesis, it’s okay. I remember once I did a lab involving different sugars and enzymes and I was sure of my hypothesis, but my results didn’t match my prediction. After a class discussion, we found out that quite a few other people didn’t get their expected results either and it turns out the enzymes we were using were expired. So if you don’t get the expected results, maybe you did the lab wrong or maybe not, either way don’t fake data, talk to your teacher instead.
5. Learn your word roots
A lot of biology terms (particularly anatomy and biomed) are from Greek and Latin roots. Now you don’t need to go take a Latin class or anything, but look up etymologies and focus on recurring prefixes and suffixes (e.g. hemo-, hypo-, -cyte, -derm) and soon you’ll begin to be able to predict what a term means before looking it up.
6. Review
A lot of concepts in biology are interconnected and you need to know one topic to understand another. For this reason, always review anything you’re rusty on especially if you plan on taking other biology classes in the future.
🌠Guide to Study Guides
Hi, so I make study guides when I revise as referenced to in this post/ask here. So in this post I’m gonna try and show you guys how I go about making a study guide like I did for sociology or philosophy, both of which are shown in that link there. This is my method so it probably is really complicated and stuff, I know for sure that my guides are overly “fancy” and whatnot, but it makes me happy and I guess the extra effort does pay off, at least aesthetically.

Okay, yes, let’s begin…
1. Visit colourlovers.com to choose a colour scheme for your guide!
I’ve provided the link to the most loved palette page which is where I choose my colour scheme. In Word, you change your colour scheme by choosing Page Layout > Colour > Create New Theme Colours and you go from there!! I basically started making my own colour schemes after I went through all the ones already provided by Word, but to be honest you can start with those since they’re really nice too. I recommend: Apex, Composite, Foundry, Metro, Module, Slipstream and Solstice.
If you do want to make your own colour scheme, you should get ready to do some fiddling around because I still don’t get this really. Making a colour scheme on Word requires at least 10 colours, that’s okay because on colourlovers, palettes are usually made up of 5 so just choose 2 that you think suit each other :) After this you need to input the hex codes manually into the popup window of “Create New Theme Colours” starting from Text/Background - Dark 2 to Accent 6. The hex codes are provided by individually clicking on the colours.

So that’s what one of my self-made colour schemes look like, you should be aware that Word usually randomises these? I don’t really know how it works but basically sometimes the colours won’t necessarily be in that order when you go to select it to specifically colour a word, if that’s the case you’ll just have to fiddle and change it around to choose your preferred colour in the scheme. Also not all the colours will go into the textbox options so be aware of that too!
2. Font shopping
Next if I haven’t updated the font collection for a while I’ll go to dafont.com because I just…really like jazzy fonts. From here I’ll either check out “All The New Fonts” (option is at the bottom of the front page) or go to the menu titled Script, and check out Handwritten, Fancy or Various. Here are some links to asks about fonts that I’ve used in my shown study guides or just fonts I like in general!! 1 and 2.
Okay so as you can see in the Disney Princess Document/Sociology Study Guide I used at least five fonts, I usually average around 4? Once downloaded choosing fonts that you like for your guide is basically a trial and error process, I choose any fonts that I like or haven’t recently used or just recently downloaded that I want to try out and I match them with what I think would look nice! Here I’ll show you why I use around four or more fonts:

In order to make the process of typing up your guide with these fonts easier, highlight one, so for example the Big Title, right click > Styles > Save Selection as New Quick Style…and it’ll be available to you in the Quick Styles menu underneath a heading like Style1. After this to easily change a font to that particular font, just highlight, go to Quick Styles, choose that particular font and bam! I try to make my fonts match, so if one is bold, I aim for at least a thick-ish font in the rest of my choices. Now to go through what they’re for.
So obviously the Big Title is for your BIG TITLE that could be your subject or your main topic, so if it was sociology (like in the first pic) I would use it for Key Concepts and Methods, I might later reuse the font for another BIG TOPIC, but really…it’s your choice.
The Subtitle is what I would use for well…your subtitle, so following my first pic it would be the subtitle of Positivism versus Interpretivism…Three Key Concepts, etc. The heading is therefore for the headings under the subtitle (this is only if you’re making a guide for something that is like intensely sectioned, like sociology), so I’d use that font for where it says Reliability etc.

It just brings something extra on top of all the later colour you’ll probably use, although I only use it for like a set theme, so dates, names etc. and only either a word or a phrase, if it gets too long it’ll just mess up the format of your sentence.
3. Okay, so you’re happily typing away but now you wanna add the speech bubbles, you wanna add the textboxes and the Disney princesses! Don’t worry my friend, I got you.
Basically I add textboxes or speech bubbles for 2 reasons, either to highlight a particular point or differentiate a piece of information from the rest OR to fill up space because of some particular study guide pet peeves.
Pet peeve, when a particular sentence ends like this:

I know it might seem like a bit much, but to be honest, it throws the whole format of a block of text if a bit of it ends with like this huge expanse of space. So in this instance I either will insert a photo or I’ll try and delete a word or add a word until I’m satisfied. THIS IS JUST ME, IF YOU DON’T CARE OBVIOUSLY IT DOESN’T MATTER 👌
You can insert speech bubbles by going to Insert > Shapes > Callouts (you’ll find it there) and textboxes by going to Insert > Textbox > Draw Textbox (I draw mine since I don’t tend to use the ones provided by Word. With the speech bubbles they actually act as textboxes, but I’ve found that using it in that way takes up a lot of space as in your words won’t necessarily take up the whole of the speech bubble so it simply expands and it’s all messy. Therefore, I put a textbox on the top of it, make the background and outline transparent and type there to save space.
Here are some examples of when I’ve used photos or speech bubbles to fill up space or solve the annoying sentence problem.


I generally tend to have themes around what photos I use, so for example my sociology guide was largely based on Disney/Cartoon Network depending on how I felt and I’d use particular photos to emphasise a point and make it more entertaining I guess… As you can see the speech bubbles with LSP are for filler purposes but also to differentiate information, it just adds something extra really. Also because I continuously indent my guides (since I type with bullet points) as they get further and further in they’ll leave gaps that can be filled with photos, seen here with what I’ve done with LSP. Also with the photos that I choose, I search for the ones with a grey, checkered background which means that they’ll be transparent, allowing me to put them in front of a textbox or just makes overall design easier, it means that I can have the Gangreen Gang in front of that textbox like that :)
4. Final step, going over your guide when it’s done.
I then go through the guide again and highlight, underline, italicise, bold, colour etc. particular points of a sentence/paragraph that I want to remember! I do this in order of the colour scheme that appears in the menu when you click to change the colour of a font, so I’ll highlight particular words for a portion of a paragraph before changing, achieving a sort of a rainbow effect, like so:

These are from my history study guide, where I made front covers (which I don’t usually do…I feel like all my guides really depend on how I feel and my subject). This is what they looked like if you wanted an idea for something you could do too!!

Um..so that’s pretty much it! I’ve tried to make this as extensive and as in-depth as I can, I’m sorry it ended up SO LONG, I’ve never made a post this long before so I’m really sorry. I would put it under a read more but I feel like the font on my blog is too tiny for when it’s redirected and I’d much rather not have everyone straining their eyes. If you guys have any more questions, please feel free to ask. If you want any more examples or screen shots of my guides, just hit up my ask box!! Sorry for this taking so long and being so long once again and I really hope it helps you all in at least some way!
***As an addition, those washi tapes you see are digital washi tapes which you can get just by googling! I use the free ones which only require a lil’ searching for. Also please tag me in whatever study guides you make and upload, I’d love to see them!!


More biology notes. Reviewing my old notes on Ecology, Evolution and Population Ecology for my Biology final exam.
How to make an awesome study guide / make notes on your computer
Writing by hand can be great in class or for jotting down notes from skimming through the text book. A great way to combine those notes are typing them up on your computer, and then print them out. Neat perfect notes with less paper wasted. Well printed out you can work with them even more to really get that information to stay.
Go from 100 pages in the text book + a pile of handwritten notes to just a couple of pages of typed notes.
When typing them:
Layout. For each paragraph I make a headline in bold text. After that I use bullets and italicize terminology. I format the body text to be in two columns to save space and easier reading.
Keep it short. I never write full sentences or grammatically correct. Write as short as possible while still getting the important information through. Making up abbreviations are an easy way to keep things short. It doesn’t have to look pretty, just make sure you understand it.
Simplify. Use arrows, dashes, colons, equal signs to indicate how different subjects and explanations are connected. Avoid “unnecessary“ words like "meaning…”, “such as”, “is the same as”. Use symbols instead.
Tables. Making tables is an excellent idea for comparing things with different parameters. In your word processing program you can make your own pretty table designs or use pre-made ones. Sometimes simple ones are better though.
Paginate. Obvious but extremely useful!
Print on both sides of the paper. With half the amount of paper it kind of psychologically feel that you have less material to learn.
Example:
What not to write:
Different species have different niches. You can define a niche as a species specialty, like its job.
Instead, try to remove unnecessary words that don’t contain much information.
Niche = a specie’s specialty, job.
When you have them on paper
All freshly printed and done? Great! Take your pens, pencils and highlighters and let’s go through the material. The first time I go through it I let it take a good while and I read it very carefully with my highlighters and pens handy.
Highlighting. If you’re into highlighting I have some tips for you. Don’t use one colour. Use several and assign each colour a different task or role. For me it really makes a big difference and I can see what’s what. Here’s an example of how I do it:
Pink: Headlines and headings Blue: Terms and words Green: Definitions and meaning of the term. (Green explains blue) Yellow: Examples and misc
Drawing. It’s helpful if you couldn’t draw said thing on the computer. What I like to do though is to make small doodles related to the terms, definitions, examples or the paragraphs in them selves in the margin.
Notes. Take notes or mark off things you find extra hard or confusing.
When you’ve done all of that and your notes are a colourful clusterfuck I read them through again and again. You can also hold over the paragraph and try to either write down or explain verbally what the paragraph is about. Try not to completely memorize the paragraphs, instead really try to understand the concept.
I hope that was helpful for some of you :) I know exams are coming up and this can be a fun thing to try out. After I’ve made my study guide I almost exclusively study from it. I don’t use the textbook from that point on except for answering practice questions.
If you have any questions, feel free to send me a message.
Good luck! ♥