I Never Used To Do Notes For Any Classes But This Year I Promised Myself To Put Effort Into Making My


i never used to do notes for any classes but this year i promised myself to put effort into making my notes look decent and it’s definitely a work in progress ✨
More Posts from Marathon-notasprint and Others
Maybe it’s just me, but I think a significant part of career planning and goal setting in medicine is developing the ability to acknowledge that you can have an interest in many things (which is a good thing, it keeps you keen and motivated) but you become conscious of the fact that that doesn’t necessarily mean you want to/can/should aim for a career in that area, if you know what I mean? And that realisation that you now have an idea of where you want your career to go is what ends up motivating you once you get past that initial ‘everything in medicine is exciting’ phase. At the beginning of med school/clinics, you think to yourself “woah, I’m interested in so many things - neuro, cardio, infectious diseases, general surgery, anaesthetics - I wish there was a path that would combine everything!” and yeah there are generalists and all that but (at least personally) sometimes you think about it all and you realise that there are aspects of medicine that you are happy to keep as just a ‘personal interest’, and others which you just can’t let go of. For example, I am fairly committed to paeds (I mean, I haven’t graduated yet but I’m 99% certain I want to work in paeds) but I also have special interests in psychiatry and anaesthetics/intensive care medicine - but over the years I’ve come to realise that just because I’m particularly interested in it does not mean I’m now ‘destined’ to be a psychiatrist or an anaesthetist, nor do I think an academic interest in neurological research would make me a good neurologist. When it comes down to it, even the basic divisions like medicine/surgery/GP can feel confusing when you’re 95% set on medical but have a lingering interest in ENT or neurosurgery - and I’ve talked to a couple different people who have interpreted this lingering interest as a sign that they need to somehow combine all their interests into one impossible career. When you’re younger and in school it feels like you have so many routes and can keep up with every single little thing you’re interested in, and everything seems so pressured, when in reality I think the path is a little clearer than some people would have us believe? As intelligent, curious people, it’s only natural to feel keen on learning about so many different things, but I think we all have to recognise that not everything is a 'sign’ - sometimes you are just interested in interesting things.
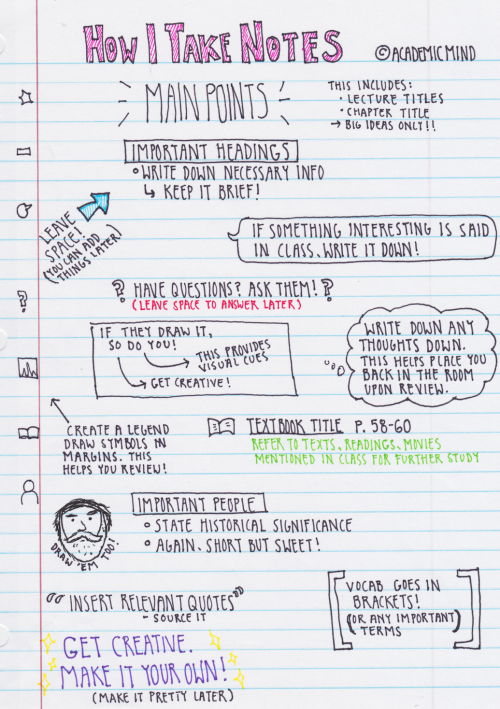
Some of you have requested that I show you my note taking technique. This is in no way a proven technique, but it really works for me and many of my professors have applauded my structure. So try it, and if you like it and it works for you, great! If not, I commend you on having a more structured system! These are my general rules when I take notes:
1. Leave space. A lot of space. While going through previous notes, whether it be right after class or a month later, I always found that I had information that I wanted to add, and cramped pages never allowed for that. Plus, it’s a bit less daunting on the eyes when there is some room between ideas. I do realize that this is not very eco-friendly, but hey!
2. Use the margins in a smart way. I have developed a “legend” of symbols to draw in the margins so that when I need a quick scan of what pages in the textbooks I referenced or vocab, I can find what I need easily. It might not seem useful on this one page, but when you have a whole 3″ binder full of notes, it’s a blessing.
3. Write on one side of the page. Again, not a eco-friendly option. However, I’m sure there are those of you (my past self included) who have wished you just had another page to write down book notes or additional thoughts without having to get a fresh paper. This solves that!
4. Make it pretty later. I know this page is visually appealing, but keep in mind that I was in my nice warm room by myself and listening to music while writing this. My notes straight out of class aren’t color coded and they definitely don’t have cute little decorations on them; just get the information down, worry about aesthetics later.
5. Put yourself in the classroom. You might think: “but I’m physically in the room what the hell are you talking about”. The concept is weird but it works. I always try everything I can to make sure I place as many visual cues in my notes as I can so that when I look back on them later I remember exactly where I was and what was happening. Are you not paying attention and thinking of food? Write it down. Did someone fart? Write it down. Placing yourself in the room is the most beneficial thing you can do for future you.
6. Keep it short. I can’t tell you how many times I freaked out when I first got to college because I was trying to write everything down. I was certain I was going to miss something. WELL HAVE I GOT NEWS FOR YOU. You aren’t going to miss anything if you keep your bullets to a minimum of one sentence. It’s proven that short phrases in your own words help memory better than full sentences that the professor gives you.
Finally, make it yours. This is a system that works for me because my brain is weird and can’t take notes the Cornell or outline way. The most important thing to learn in school is your own flow of things. Experiment, be creative! I hope I have helped those of you who aren’t traditional learners realize that there isn’t just one way to process information. If any of you have any questions or need specific examples, let me know! (I realize there is a typo on this but hey don’t worry about it) 🙈
my masterlist of 'how to life’ tips
Cleaning & Tidying
Make your bed in the morning. It takes seconds, and it’s worth it.
Reset to zero each morning.
Use the UFYH 20/10 system for clearing your shit.
Get a reed diffuser and stick it on your windowsill.
Have a ‘drop-zone’ box where you dump anything and everything. At the beginning/end of the day, clear it out and put that shit away.
Roll your clothes, don’t fold them - or fold them vertically.
Automate your chores. Have a cleaning schedule and assign 15mins daily to do whatever cleaning tasks are set for that day. Set a timer and do it - once the timer is up, finish the task you’re on and leave it for the day.
Fold your clothes straight out of the tumble dryer (if you use one), whilst they’re still warm. This minimises creases and eliminates the need for ironing.
Clean your footwear regularly and you’ll feel like a champ.
Organisation & Productivity
Learn from Eisenhower’s Importance/Urgency matrix.
Try out the two-minute rule and the Pomodoro technique.
Use. A. Planner. (Or Google Calendar, if that’s more your thing.)
Try bullet journalling.
Keep a notebook/journal/commonplace book to dump your brain contents in on the regular.
Set morning alarms at two-minute intervals rather than five, and stick your alarm on the other side of the room. It’s brutal, but it works.
Set three main goals each day, with one of them being your #1 priority. Don’t overload your to-do list or you’ll hit overload paralysis and procrastinate.
If you’re in a slump, however, don’t be afraid to put things like “shower” on your to do list - that may be a big enough goal in itself, and that’s okay.
Have a physical inbox - a tray, a folder, whatever. If you get a piece of paper, stick it in there and sort through it at the end of the week.
Consider utilising the GTD System, or a variation of it.
Try timeboxing.
Have a morning routine, and guard that quiet time ferociously.
Save interesting-looking shit to instapaper. Have a set time where you read through the stuff you saved to instapaper and save the shit that you like from instapaper to evernote (or bookmark it properly).
During your working hours, put on your footwear, even if you’re sat on your bed. (Why?)
Have a folder for all your important documents and letters, organised by topic (e.g. medical, bank, university, work, identification). At the front of this folder, have a sheet of paper with all the key information written on it, such as your GP’s details, your passport details, driving licence details, bank account number, insurance number(s), and so on.
Try using StayFocusd and RescueTime (or similar apps/extensions). (I promise, you’ll find that you’re not as busy as you think you are.)
Schedule working time and down time alike, in the balance that works for you.
Money
Have. A. God. Damn. Budget.
Use a money tracker like toshl, mint, or splitwise. Enter all expenses asap! (You will forget, otherwise.)
Have a ‘money date’ each week, where you sort through your finances from the past seven days and then add it to a spreadsheet. This will help you identify your spending patterns and whether your budget is actually working or not.
Pack your own frickin’ lunch like a grown-up and stop buying so many takeaway coffees. Keep snacks in your bag.
Go to your bank and take out £100 in £1 coins (or w/e your currency is). That shit will come in useful for all kinds of things and you’ll never be short on change for the bus or the laundry.
Food & Cooking
Know how to cook the basics: a starch, a protein, a vegetable, and a sauce.
Simple, one-pot meals (“a grain, a green, and a bean”) are a godsend.
Dried porcini mushrooms make a fantastic stock to cook with.
Batch cook and freeze. Make your own ‘microwave meals’.
Buy dried goods to save money - rice and beans are a pittance. (Remember to soak dried beans first, though!)
Consider Meatless Mondays; it’s healthier, cheaper, and more environmentally friendly.
Learn which fruits and vegetables are cheapest at your store, and build a standard weekly menu around those. (Also remember that frozen vegetables are cheap and healthy.)
Learn seasoning combinations. Different seasoning, even with the exact same ingredients, can make a dish seem completely new.
Don’t buy shit for a one-off recipe, especially if you won’t use it all. If you really want to try out a recipe, see if a friend would be interested in making it with you, then pool for the expenses.
Make your own goddamned pasta sauce. Jamie Oliver has a decent recipe here, but the beauty of tomato sauce is that you can totally wing it and adapt the fuck out of it.
Misc
Have a stock email-writing format.
Want to start running, but find it boring? Try Zombies, Run!.
Keep a goddamn first aid kit and learn how to use it.
Know your OTC pain relief.
Update your CV regularly.
Keep a selection of stamps and standard envelopes for unexpected posting needs. (It happens more regularly than you would think!)
Some final words of advice:
Organisation is not a goal in itself, it is a tool. Don’t get caught up in the illusion of productivity and get distracted from the actual task at hand.
Routines and habits will help you. Trust in them.
You have the potential to be an organised and productive person, just as much as anybody else. It just takes practice.

HELLO AGAIN EVERYONE!
I thought that since in the last few days I’ve been working on organizing my school supplies I share a bit about how i organize my binders! I hope this helps some of you a little bit! :)
Things You’ll Need:
One set of dividers for each binder
One 1 ½” binder per class, per semester
Optional Supplies:
Labels
Step One:
Lay out one full set of your dividers and decide what kind of organizational scheme you’re going for. Possible systems include:
Chronological Order – This is usually the best choice if you haven’t received or won’t receive a full and detailed class syllabus. In this system your first divider will show you where all of your important documents for the class are held (for example: you might put thing like project outlines here). The next divider will separate where regular handouts and class work from the rest of your papers. After your handouts, you’ll want to create a section for your in-class notes. Following this, you’ll want to place a divider to separate your homework assignments. These two sections are where the chronology of the class comes into play, because you’ll want to date everything and keep it in chronological order. After your homework assignments you’ll want one final divider so that you have a place to keep all of the marked tests and assignment rubrics you’ve got back from your teacher/professor.
The Sandwich – This system works best when you receive a full and detailed class syllabus. At the front of your binder, create a section using one divider for important documents (like the syllabus). After this, create one section for each major unit you’ll be covering in class. After these sections, you want one final one for tests and rubrics that have been graded and handed back to you.
If you feel that colour coding helps you stay organized, try to stick to one system for all of your binders; this way you can use the same colours in all of your binders for their respective sections (e.g., red for important documents, green for graded tests/rubrics, etc.).
(Optional) Step Two:
If you’re planning on labeling all of your binders, now would be a perfect time to do so. Possible uses for the labels might include: using one on the front/spine of the binder detailing the name of the class, the teacher, and the building and room in which it’s held, or using them to label each of your dividers with the names of their sections.
Step Three:
Insert all of your dividers into your binders, making sure to add a little bit of loose-leaf paper where you need to. If you’re using a notebook instead of loose-leaf for your homework or other things, make sure you still add a bit of paper – just for those days when you’re in a rush or you’re just not feeling well and you totally didn’t forget your notebook… ;)
Step Four:
Step back and admire your work, then remind yourself that the things that go in these binders are important, but they aren’t so important that they can ruin your life. You’ll be okay if you don’t reach your targets, but that shouldn’t stop you from trying to reach them. Do your best and recognize that that’s the extent of what you can do. I believe in you.
Now before I finish, I’d like to add a small disclaimer: by no means am I saying that the methods of organization are the only or the best methods to use, however they are the ones I’ve always used and I’ve found they work quite well. If your teacher wants you to organize in a certain way, use that way, and if you have a system that you like and find works well for you, feel free to message me – I’d love to learn about it!
I hope everyone has/has had a wonderful first few weeks of school! If you haven’t or you’re feeling overwhelmed, my ask is ALWAYS open if you want to talk! I love you all, and I BELIEVE IN ALL OF YOU ♥
5 Tips when it comes to Mind Mapping
1) Decide on your paper size Before you start writing anything it’s really important to work out what size paper you want to do your mindmap on. Be it A3, A4, A5 or any other size you can think of, deciding this early on will make things much easier in the long run and leave you with a much more organised mind map
2) Work out the basics Before you actually start writing anything it’s a really good idea to work out the basics of your mind map. What type of bubble do you want the title to be in? Spiky or a cloud or just a plain circle? What kind of lines to you want leading off from it? Arrows or just plain lines? Straight or curved? Taking 30 seconds to work these out before you start will make everything much easier in the long run and leave you with a much neater and better organised mind map
3) Choose what to write with This part is all down to personal preference. Do you prefer writing in a plain colour and then highlighting later? Do you want each section in a different colour? Felt tips or biros? Fineliners or pencils? This is the time when you can think about what you’re most comfortable writing with and what’s going to make it easiest for you to retain the information
4) Add pictures and diagrams Adding little drawings to aid your explanations is a really great way to help you remember what you write. You don’t have to be good at art to make this work, just add a few little diagrams here and there and you’ll be surprised how much more easily you retain the information
5) Have fun with it You may be looking at a picture of a mind map online and saying to yourself ‘that’s exactly what I want mine to look like’ but in reality that’ll never happen. You’ll never manage to get a mind map that looks exactly the same as someone else’s and in all honesty that would be a bit boring. Instead just get stuck in and create your own unique masterpiece
Medical School Resources! (and other human biology,physiology,biochemistry-related resources)
Hi Everyone!
Update: I am now officially done with my second year! I know i’ve been MIA on here for a while now - but that’s only because I was drowning in textbooks and assignments! I will be writing a whole other post on what my second year in medical school was like - so watch out for that :)
I, for one, can not just rely on one method of learning. Meaning, I’ll jump from videos, to textbooks, to flashcards. In this post I’m going to list some of my holy grail youtube channels that have helped saved me.
1) Handwritten Tutorials
https://www.youtube.com/user/harpinmartin
Every video in this channel is short, but not so much that you feel like you’re missing out on information. Definitely one to save as a favourite!
2) Armando Hasudungan
https://www.youtube.com/user/armandohasudungan
The best thing about this channel is the fact that there are over 300 videos, covering a wide range of core topics in endocrinology, neurology, physiology and pharmacology. Another pro is the presentation of topics (otherwise considered snooze-worthy) in an artistic manner!
3) Speed Pharmacology
https://www.youtube.com/channel/UC-i2EBYXH6-GAglvuDIaufQ
Raise your hand if you’ve ever fallen asleep trying to read about the mechanism of action of opioids, their side effects and contraindications. I know I have. Fret not, for this youtube channel will introduce you to a world where pharmacology is actually interesting.
4) Wendy Riggs
https://www.youtube.com/user/wendogg1
Wendy Riggs is a very down-to-earth professor in Northern California, and she covers a wide range of topics in Anatomy, Physiology and General Biology.
5) Anatomy Zone
https://www.youtube.com/user/TheAnatomyZone
A better way to learn anatomy is to supplement your textbook information with videos from this channel. The explanations and visuals provided are absolute gold.
I hope you all find these channels as helpful as I did!
🌠Guide to Study Guides
Hi, so I make study guides when I revise as referenced to in this post/ask here. So in this post I’m gonna try and show you guys how I go about making a study guide like I did for sociology or philosophy, both of which are shown in that link there. This is my method so it probably is really complicated and stuff, I know for sure that my guides are overly “fancy” and whatnot, but it makes me happy and I guess the extra effort does pay off, at least aesthetically.

Okay, yes, let’s begin…
1. Visit colourlovers.com to choose a colour scheme for your guide!
I’ve provided the link to the most loved palette page which is where I choose my colour scheme. In Word, you change your colour scheme by choosing Page Layout > Colour > Create New Theme Colours and you go from there!! I basically started making my own colour schemes after I went through all the ones already provided by Word, but to be honest you can start with those since they’re really nice too. I recommend: Apex, Composite, Foundry, Metro, Module, Slipstream and Solstice.
If you do want to make your own colour scheme, you should get ready to do some fiddling around because I still don’t get this really. Making a colour scheme on Word requires at least 10 colours, that’s okay because on colourlovers, palettes are usually made up of 5 so just choose 2 that you think suit each other :) After this you need to input the hex codes manually into the popup window of “Create New Theme Colours” starting from Text/Background - Dark 2 to Accent 6. The hex codes are provided by individually clicking on the colours.

So that’s what one of my self-made colour schemes look like, you should be aware that Word usually randomises these? I don’t really know how it works but basically sometimes the colours won’t necessarily be in that order when you go to select it to specifically colour a word, if that’s the case you’ll just have to fiddle and change it around to choose your preferred colour in the scheme. Also not all the colours will go into the textbox options so be aware of that too!
2. Font shopping
Next if I haven’t updated the font collection for a while I’ll go to dafont.com because I just…really like jazzy fonts. From here I’ll either check out “All The New Fonts” (option is at the bottom of the front page) or go to the menu titled Script, and check out Handwritten, Fancy or Various. Here are some links to asks about fonts that I’ve used in my shown study guides or just fonts I like in general!! 1 and 2.
Okay so as you can see in the Disney Princess Document/Sociology Study Guide I used at least five fonts, I usually average around 4? Once downloaded choosing fonts that you like for your guide is basically a trial and error process, I choose any fonts that I like or haven’t recently used or just recently downloaded that I want to try out and I match them with what I think would look nice! Here I’ll show you why I use around four or more fonts:

In order to make the process of typing up your guide with these fonts easier, highlight one, so for example the Big Title, right click > Styles > Save Selection as New Quick Style…and it’ll be available to you in the Quick Styles menu underneath a heading like Style1. After this to easily change a font to that particular font, just highlight, go to Quick Styles, choose that particular font and bam! I try to make my fonts match, so if one is bold, I aim for at least a thick-ish font in the rest of my choices. Now to go through what they’re for.
So obviously the Big Title is for your BIG TITLE that could be your subject or your main topic, so if it was sociology (like in the first pic) I would use it for Key Concepts and Methods, I might later reuse the font for another BIG TOPIC, but really…it’s your choice.
The Subtitle is what I would use for well…your subtitle, so following my first pic it would be the subtitle of Positivism versus Interpretivism…Three Key Concepts, etc. The heading is therefore for the headings under the subtitle (this is only if you’re making a guide for something that is like intensely sectioned, like sociology), so I’d use that font for where it says Reliability etc.

It just brings something extra on top of all the later colour you’ll probably use, although I only use it for like a set theme, so dates, names etc. and only either a word or a phrase, if it gets too long it’ll just mess up the format of your sentence.
3. Okay, so you’re happily typing away but now you wanna add the speech bubbles, you wanna add the textboxes and the Disney princesses! Don’t worry my friend, I got you.
Basically I add textboxes or speech bubbles for 2 reasons, either to highlight a particular point or differentiate a piece of information from the rest OR to fill up space because of some particular study guide pet peeves.
Pet peeve, when a particular sentence ends like this:

I know it might seem like a bit much, but to be honest, it throws the whole format of a block of text if a bit of it ends with like this huge expanse of space. So in this instance I either will insert a photo or I’ll try and delete a word or add a word until I’m satisfied. THIS IS JUST ME, IF YOU DON’T CARE OBVIOUSLY IT DOESN’T MATTER 👌
You can insert speech bubbles by going to Insert > Shapes > Callouts (you’ll find it there) and textboxes by going to Insert > Textbox > Draw Textbox (I draw mine since I don’t tend to use the ones provided by Word. With the speech bubbles they actually act as textboxes, but I’ve found that using it in that way takes up a lot of space as in your words won’t necessarily take up the whole of the speech bubble so it simply expands and it’s all messy. Therefore, I put a textbox on the top of it, make the background and outline transparent and type there to save space.
Here are some examples of when I’ve used photos or speech bubbles to fill up space or solve the annoying sentence problem.


I generally tend to have themes around what photos I use, so for example my sociology guide was largely based on Disney/Cartoon Network depending on how I felt and I’d use particular photos to emphasise a point and make it more entertaining I guess… As you can see the speech bubbles with LSP are for filler purposes but also to differentiate information, it just adds something extra really. Also because I continuously indent my guides (since I type with bullet points) as they get further and further in they’ll leave gaps that can be filled with photos, seen here with what I’ve done with LSP. Also with the photos that I choose, I search for the ones with a grey, checkered background which means that they’ll be transparent, allowing me to put them in front of a textbox or just makes overall design easier, it means that I can have the Gangreen Gang in front of that textbox like that :)
4. Final step, going over your guide when it’s done.
I then go through the guide again and highlight, underline, italicise, bold, colour etc. particular points of a sentence/paragraph that I want to remember! I do this in order of the colour scheme that appears in the menu when you click to change the colour of a font, so I’ll highlight particular words for a portion of a paragraph before changing, achieving a sort of a rainbow effect, like so:

These are from my history study guide, where I made front covers (which I don’t usually do…I feel like all my guides really depend on how I feel and my subject). This is what they looked like if you wanted an idea for something you could do too!!

Um..so that’s pretty much it! I’ve tried to make this as extensive and as in-depth as I can, I’m sorry it ended up SO LONG, I’ve never made a post this long before so I’m really sorry. I would put it under a read more but I feel like the font on my blog is too tiny for when it’s redirected and I’d much rather not have everyone straining their eyes. If you guys have any more questions, please feel free to ask. If you want any more examples or screen shots of my guides, just hit up my ask box!! Sorry for this taking so long and being so long once again and I really hope it helps you all in at least some way!
***As an addition, those washi tapes you see are digital washi tapes which you can get just by googling! I use the free ones which only require a lil’ searching for. Also please tag me in whatever study guides you make and upload, I’d love to see them!!
Note Taking Systems
The Cornell Method
The Cornell method provides a systematic format for condensing and organizing notes without laborious recopying. After writing the notes in the main space, use the left-hand space to label each idea and detail with a key word or “cue.”
Method
Rule your paper with a 2 ½ inch margin on the left leaving a six-inch area on the right in which to make notes. During class, take down information in the six-inch area. When the instructor moves to a new point, skip a few lines. After class, complete phrases and sentences as much as possible. For every significant bit of information, write a cue in the left margin. To review, cover your notes with a card, leaving the cues exposed. Say the cue out loud, then say as much as you can of the material underneath the card. When you have said as much as you can, move the card and see if what you said matches what is written. If you can say it, you know it.
Advantages
Organized and systematic for recording and reviewing notes. Easy format for pulling out major concept and ideas. Simple and efficient. Saves time and effort. “Do-it-right-in-the-first-place” system.
Disadvantages
None
When to Use
In any lecture situation.
The Outlining Method
Dash or indented outlining is usually best except for some science classes such as physics or math.
The information which is most general begins at the left with each more specific group of facts indented with spaces to the right.
The relationships between the different parts is carried out through indenting.
No numbers, letters, or Roman numerals are needed.
Method
Listening and then write in points in an organized pattern based on space indention. Place major points farthest to the left. Indent each more specific point to the right. Levels of importance will be indicated by distance away from the major point. Indention can be as simple as or as complex as labeling the indentations with Roman numerals or decimals. Markings are not necessary as space relationships will indicate the major/minor points.
Advantages
Well-organized system if done right. Outlining records content as well as relationships. It also reduces editing and is easy to review by turning main points into questions.
Disadvantages
Requires more thought in class for accurate organization. This system may not show relationships by sequence when needed. It doesn’t lend to diversity of a review attach for maximum learning and question application. This system cannot be used if the lecture is too fast.
When to Use
The outline format can be used if the lecture is presented in outline organization. This may be either deductive (regular outline) or inductive (reverse outline where minor points start building to a major point). Use this format when there is enough time in the lecture to think about and make organization decisions when they are needed. This format can be most effective when your note taking skills are super sharp and you can handle the outlining regardless of the note taking situation.
Example:
Extrasensory perception
definition: means of perceiving without use of sense organs.
three kinds
telepathy: sending messages
clairvoyance: forecasting the future
psychokinesis: perceiving events external to situation
current status
no current research to support or refute
few psychologists say impossible
door open to future
The Mapping Method
Mapping is a method that uses comprehension/concentration skills and evolves in a note taking form which relates each fact or idea to every other fact or idea. Mapping is a graphic representation of the content of a lecture. It is a method that maximizes active participation, affords immediate knowledge as to its understanding, and emphasizes critical thinking.
Advantages
This format helps you to visually track your lecture regardless of conditions. Little thinking is needed and relationships can easily be seen. It is also easy to edit your notes by adding numbers, marks, and color coding. Review will call for you to restructure thought processes which will force you to check understanding. Review by covering lines for memory drill and relationships. Main points can be written on flash or note cards and pieced together into a table or larger structure at a later date.
Disadvantages
You may not hear changes in content from major points to facts.
When to Use
Use when the lecture content is heavy and well-organized. May also be used effectively when you have a guest lecturer and have no idea how the lecture is going to be presented.
Example:

The Charting Method
If the lecture format is distinct (such as chronological), you may set up your paper by drawing columns and labeling appropriate headings in a table.
Method
Determine the categories to be covered in the lecture. Set up your paper in advance by columns headed by these categories. As you listen to the lecture, record information (words, phrases, main ideas, etc.) into the appropriate category.
Advantages
Helps you track conversation and dialogues where you would normally be confused and lose out on relevant content. Reduces amount of writing necessary. Provides easy review mechanism for both memorization of facts and study of comparisons and relationships.
Disadvantages
Few disadvantages except learning how to use the system and locating the appropriate categories. You must be able to understand what’s happening in the lecture
When to Use
Test will focus on both facts and relationships. Content is heavy and presented fast. You want to reduce the amount of time you spend editing and reviewing at test time. You want to get an overview of the whole course on one big paper sequence.
Example:

The Sentence Method
Method
Write every new thought, fact or topic on a separate line, numbering as you progress.
Advantages
Slightly more organized than the paragraph. Gets more or all of the information. Thinking to tract content is still limited.
Disadvantages
Can’t determine major/minor points from the numbered sequence. Difficult to edit without having to rewrite by clustering points which are related. Difficult to review unless editing cleans up relationship.
When to Use
Use when the lecture is somewhat organized, but heavy with content which comes fast. You can hear the different points, but you don’t know how they fit together. The instructor tends to present in point fashion, but not in grouping such as “three related points.”
Three Examples:
Example 1:
A revolution is any occurrence that affects other aspects of life, such as economic life, social life, and so forth. Therefore revolutions cause change. (See page 29 to 30 in your text about this.)
Sample Notes:
Revolution - occurrence that affects other aspects of life: e.g., econ., socl., etc. C.f. text, pp. 29-30
Example 2:
Melville did not try to represent life as it really was. The language of Ahab, Starbuck, and Ishmael, for instance, was not that of real life.
Sample Notes:
Mel didn’t repr. life as was; e.g., lang. of Ahab, etc. not of real life.
Example 3:
At first, Freud tried conventional, physical methods of treatment such as giving baths, massages, rest cures, and similar aids. But when these failed, he tried techniques of hypnosis that he had seen used by Jean-Martin Charcot. Finally, he borrowed an idea from Jean Breuer and used direct verbal communication to get an unhypnotized patient to reveal unconscious thoughts.
Sample Notes:
Freud 1st – used phys. trtment; e.g., baths, etc. This fld. 2nd – used hypnosis (fr. Charcot) Finally – used dirct vrb. commun. (fr. Breuer) - got unhynop, patnt to reveal uncons. thoughts.

Superb Study Guides and Mini Moleskines
(A more concise version of this will be published in my college’s newspaper on Thursday. I will likely add or link diagrams and examples to this post, so you can check the original here.)
As a tutor, many students ask me for tips on making study guides. Generally, my response is that, “it depends”.
But hold on. Before we continue we should discuss what the purpose of a study guide really is.
Study guides fall into two main categories: study guides that prompt you to find/think about information and study guides that directly organize the information you need to know. Some professors provide you with study guides of the former kind (i.e., you’re not given the answers), and it’s essentially your job to create your own study guide of the latter type. Both categories serve the purpose of organizing information you already have in order to synthesize a study tool that best facilitates your comprehension and memorization of the information at hand, just at a different stage in the process.
Before you even start, it is helpful to be aware of the level at which you are required to know the information for your test. The most basic of these is recalling definitions, which can accomplished by use of flashcards. Other information you’ll have to know will require you to compare ideas or apply them. Think of your learning process as literal → interpretive → applicative, meaning you will need study guides that help you visualize, draw relationships, and understand material so you may memorize less in a way that helps you answer more, and better than straight memorization ever could.
–
Concept Map:
These can be anything from a basic branching diagram to a complex mind map. This type of study guide allows you to compare information in a more spatial manner than strictly linear. Let’s be honest; sometimes linear learning is unrealistic, because our world is not truly linear. This format allows you to start from the basic, bare bones of the topic you’re studying and expand into very specific details and examples. This way you can get a really solid overview of the information and delve deeper as necessary. At least for mind maps in specific, Mindly is a beautiful and highly functional mind mapping app for iOS. It’s worth the small price, I can tell you that.
Comparison Chart:
Another visually-oriented type of study guide, comparison charts are the easiest way to map out similarities and differences for various topics. The biggest advantage of this method is that you can easily find the important similarities and differences of the subjects in question without having to reread a chapter or search through your piles of notes. It won’t help you visually connect topics like a mind map would, but this very simple tool is important and useful in its own rite.
Index Cards:
Before you skip over this because you think you know what I’m talking about, this is not the same as a flashcard. Flashcards have the very basic purpose of helping you memorize information, and little else. Index cards, however, are like flashcards on steroids because they contain much more information and are used primarily to summarize key information in a portable way that allows you to easily locate more details if necessary. Allow me to break down how you might want to use this method.
Front:
Middle: Main idea [e.g. alveoli]
Upper Right: Organizational term [e.g. respiratory system]
Bottom Middle: Source of information [e.g. Chapter 17, pg. 479 or Notes from 11/26/2013]
Back:
In your own words, what’s most important to know about the concept.
Include examples, summaries, diagrams, definitions, etc.
Be detailed! Remember, this is not about strictly memorizing.
Make sure the content corresponds to level of understanding your professor excepts
Diagram:
This one is pretty self-explanatory, but is extremely dependent on the topic at hand. This could be anything from a chemical reaction scheme, a cycle, Venn diagram, etc. You may even consider making a timeline, which is great for chronological organization of ideas. This is not limited to history, though! You can also organize information from classes such as anthropology, psychology, biology, anatomy, physiology, ecology, etc. If it has a specific, linear order, it can be made into a timeline.
Question Prompts:
This method I find works very well if you use the Cornell note-taking method. If you’re using Cornell notes, you would write your prompts in the left hand column next to where the answers are located, then just cover up the answers when studying. For example, for something as simple as a definition you could write, “What is _____?” For something more complicated such as a comparison chart, you could write, “What are the key differences between _____ and _____?” If you want, you can even ask questions that aren’t directly answered in the adjacent text such as, “Why is [idea] important to [concept]?”
–
Now that you know what formats you might use for your study guides (remember you don’t have to stick with just one), you may wonder where you can put this information. The basic answer to that question: anywhere. Many people like to draw these things on computer paper. You may want to type some of these things. If you’re using Mindly then you would be inputting the information into an app. I would like to offer up the suggestion of little mini notebooks for each class. I personally make these study guide materials on paper or a computer first, then when I’m satisfied with the result, I copy it down into my pocket-sized Moleskine notebooks. I personally prefer the squared, dotted, or blank notebooks, but whatever suits your fancy. The benefit to these little notebooks is that you have all of the information you need to study for in a small, convenient little book that you can easily keep in your backpack all the time because of its size. (Ladies, it will even fit in a clutch!) Study on the bus, waiting for class to start, when eating at the cafeteria, while waiting for your laundry to finish, etc. Not to mention, this will help you avoid losing papers because they’re all in one place.
Just try not to lose the notebook.
-
 trans4m8ionn8on liked this · 7 years ago
 -
 cmajorpotato liked this · 8 years ago
 -
 study-and-work reblogged this · 9 years ago
 -
study-and-work liked this · 9 years ago
-
 solitary-saboteur liked this · 9 years ago
 -
 postgrad-gakusei reblogged this · 9 years ago
 -
 fracturedbanjo liked this · 9 years ago
 -
 beautifulnerrdd liked this · 9 years ago
 -
 dimphystudies reblogged this · 9 years ago
 -
 tharinistudies-blog reblogged this · 9 years ago
 -
 vamos-falar-sobre-estudos liked this · 9 years ago
 -
 elizastudies reblogged this · 9 years ago
 -
 studylittledreamer-blog liked this · 9 years ago
 -
 csdstudies reblogged this · 9 years ago
 -
 studyment-blog reblogged this · 9 years ago
 -
 monyhastostudy reblogged this · 9 years ago
 -
 ingenue-again liked this · 9 years ago
 -
 beauty-and-learning-blog reblogged this · 9 years ago
 -
 paperplanesplanet liked this · 9 years ago
 -
 inesstylezz liked this · 9 years ago
 -
 jeepers-kreepers liked this · 9 years ago
 -
 notquitenightingale-blog reblogged this · 9 years ago
 -
 proudlatinx-blog reblogged this · 9 years ago
 -
proudlatinx-blog liked this · 9 years ago
-
 still-stu-dying reblogged this · 9 years ago
 -
 studyingintheory reblogged this · 9 years ago
 -
 arqurbstudies reblogged this · 9 years ago
 -
 beingmadisntalwaysbad reblogged this · 9 years ago
 -
 ryanyjc liked this · 9 years ago
 -
 slytherintostudying liked this · 9 years ago
 -
 marathon-notasprint reblogged this · 9 years ago
 -
 musicandscience reblogged this · 9 years ago
 -
 lixiepixie liked this · 9 years ago
 -
 bleeveinlearning-blog reblogged this · 9 years ago
 -
bleeveinlearning-blog liked this · 9 years ago
-
 iliketothinkiamafashionista liked this · 9 years ago
 -
 itsumowakaranai liked this · 9 years ago
 -
 vintchy liked this · 9 years ago
 -
 unlucky-studying reblogged this · 9 years ago